An ASA can be configured to operate in transparent firewall mode, such that it appears to operate as a Layer 2 device, without becoming a router hop or a gateway to its connected networks. This is also knwon as a Layer 2 firewall or a stealth firewall, because the ASA's interfaces have no assigned IP addresses and cannot be detected or manipulated. Only a single management address is used for traffic sourced by the transparent firewall itself or destined for a management session.
As a Layer 2 device, an ASA in transparent firewall mode can be installed or wedged into an existing network, separating the inside and outside without changing any IP address. This is commonly called a "bump-in-the-wire" because the ASA doesn't break or segment the IP subnet along a wire but instead more or less becomes part of the wire. This makes a new installation straigthforward.
You can also think of a transparent mode firewall as a type of transparent bridge, where packets are bridged from one interface to another based only on their MAC addresses. The ASA must maintain a MAC address table of the source address learned in each received packet, along with the interface on which the packet arrived. Once a MAC address has been learned, the ASA is able to forward a packet to that address by knowing the location or the egress interface where that same address has been active before.
Comparison of the Routed and Transparent Firewall Modes
Routed Firewall Mode
* Use only when IP packets are to be inspected.
* Network readdressing is necessary across the ASA.
* All interfaces can be used.
* All ASA interfaces are available.
Transparent Firewall Mode
* Use when non-IP packets must be forwarded.
* Network readdressing is not necessary.
* Only 2-4 interfaces can be used per bridge group.
* The following features are not available:
- Dynamic routing protocols
- Dynamic DNS
- DHCP Relay
- Multicast IP routing
- Quality of service
- VPN termination for transit traffic
Configuring Transparent Firewall Mode
Before you begin configuring transparent firewall mode, you should verify which mode is currently in use. You can do that with the show firewall EXEC command. The ASA runs in default routed (or "router") mode.
ciscoasa# show firewall
Firewall mode: Router
You can enable transparent firewall mode with the following command:
ciscoasa(config)# firewall ?
configure mode commands/options:
transparent Switch to transparent mode
ciscoasa(config)# firewall transparent
ERROR: Password recovery was not changed, unable to access
the configuration register.
COREDUMP UPDATE: open message queue fail: No such file or directory/2
Transparent firewall mode begins immediately and doesn't require a reload; however, because transparent and routed firewall modes uses different approaches to network security, the running configuration will be cleared as soon as transparent mode begins. The idea is to enter transparent firewall mode and build an appropriate configuration from scratch.
For that reason, you should save the routed firewall mode running configuration to flash memory or to an external server before enabling transparent firewall mdoe. That way, you will have a copy of the configuration in case you need to revert to routed firewall mode or refer to some portion of that configuration. Because the configuration is cleared, ASDM does not offer any way to change the firewall mode.
Next, you will need to set aside ASA interfaces and configure them for transparent firewall use. For ASA release 8.4(1) or later, you can configure up to four interfaces as part of a bridge group. With earlier releases, you must use exactly two interfaces - one interface will face the "outside," less secure part of the network, while the other will face the "inside," more secure area.
Configure the interfaces exactly as you would with routed firewall mode, with the exception of any IP addresses, by supplying the following parameters:
* Interface speed and duplex mode
* Interface name
* Security level
* Bridge group number (ASA release 8.4(1) and later)
In ASDM, navigate to Configuration > Device Setup > Interfaces, select an interface, and click Edit.
If you choose to configure interfaces with the CLI instead, you can use the nameif, security-level, and bridge-group interface configuration commands.
ciscoasa(config)# interface gigabitethernet0
ciscoasa(config-if)# nameif inside
INFO: Security level for "inside" set to 100 by default.
ciscoasa(config-if)# bridge-group ?
interface mode commands/options:
<1-100> Group number of this interface
ciscoasa(config-if)# bridge-group 1
ciscoasa(config-if)# no shutdown
ciscoasa(config-if)# interface gigabitethernet1
ciscoasa(config-if)# nameif outside
INFO: Security level for "outside" set to 0 by default.
ciscoasa(config-if)# bridge-group 1
ciscoasa(config-if)# no shutdown
Next, assign a single IP address to each bridge group as a whole. This address will be used for management traffic, such as Telnet, SSH, HTTP, SNMP, syslog, TFTP, FTP, and so on. If you configure the ASA for multiple context mode, you should configure one IP address for each bridge group on each security context, including the admin context. From the interface list in ASDM, select Add and choose Bridge Virtual Interface (BVI).
ciscoasa(config-if)# interface ?
configure mode commands/options:
BVI Bridge-Group Virtual Interface
GigabitEthernet GigabitEthernet IEEE 802.3z
Port-channel Ethernet Channel of interfaces
Redundant Redundant Interface
<cr>
ciscoasa(config-if)# interface bvi ?
configure mode commands/options:
<1-100> BVI interface number
ciscoasa(config-if)# interface bvi 1
ciscoasa(config-if)# ip address 192.168.1.1 255.255.255.0
Saturday, November 23, 2013
Saturday, November 9, 2013
Detecting and Filtering Botnet Traffic on an ASA
In a botnet attack, hosts on the private side of an ASA becomes infected with malware. Each of the infected hosts tries to contact a botnet control server located somewhere on the public Internet to receive further instructions. The control server is then able to remotely control many infected hosts and align them in a coordinated attack against other resources.
Because the infected hosts are located on a secure side of the ASA, they are likely to be free to open outbound connections just like any other protected host. You can leverage the Cisco ASA Botnet Traffic Filter feature to detect botnet activity and prevent infected hosts from contacting their control servers.
When the Botnet Traffic Filter is enabled, an ASA maintains two reputation databases:
* A dynamic SensorBase database that is downloaded periodically from Cisco, which contains information about known botnet control servers.
* A static database that you can populate, which can contain a "whitelist" of known good IP addresses and domain names or a "blacklist" of known bad servers.
The Botnet Traffic Filter feature is dependent upon four things:
* A Botnet Traffic Filter license purchased from Cisco and installed on the ASA
* A DNS server, which the ASA uses to lookup names and addresses in the static database
* Botnet Traffic Filter DNS snooping, which enables the ASA to intercept DNS queries from infected hosts and match against hostnames it finds in the databases
* Live connectivity to the Internet, so that the Botnet Traffic Filter feature can communicate with Cisco
Before you begin configuring Botnet Traffic Filtering, verify that the feature license has been enabled. You can use the show version command to see a list of ASA features and their license status. Make sure Botnet Traffic Filter is listed as Enabled
ciscoasa# show version
Cisco Adaptive Security Appliance Software Version 8.4(2)
Compiled on Wed 15-Jun-11 18:17 by builders
System image file is "Unknown, monitor mode tftp booted image"
Config file at boot was "startup-config"
ciscoasa up 11 mins 39 secs
Hardware: ASA 5520, 1024 MB RAM, CPU Pentium II 1000 MHz
Internal ATA Compact Flash, 256MB
BIOS Flash unknown @ 0x0, 0KB
0: Ext: GigabitEthernet0 : address is 00ab.cd92.5200, irq 0
1: Ext: GigabitEthernet1 : address is 0000.abf1.d701, irq 0
2: Ext: GigabitEthernet2 : address is 0000.ab9a.0e02, irq 0
3: Ext: GigabitEthernet3 : address is 0000.ab64.2f03, irq 0
4: Ext: GigabitEthernet4 : address is 0000.ab84.7804, irq 0
5: Ext: GigabitEthernet5 : address is 0000.abfa.5105, irq 0
Licensed features for this platform:
Maximum Physical Interfaces : Unlimited perpetual
Maximum VLANs : 100 perpetual
Inside Hosts : Unlimited perpetual
Failover : Active/Active perpetual
VPN-DES : Enabled perpetual
VPN-3DES-AES : Enabled perpetual
Security Contexts : 5 perpetual
GTP/GPRS : Disabled perpetual
AnyConnect Premium Peers : 25 perpetual
AnyConnect Essentials : Disabled perpetual
Other VPN Peers : 5000 perpetual
Total VPN Peers : 0 perpetual
Shared License : Enabled perpetual
AnyConnect for Mobile : Disabled perpetual
AnyConnect for Cisco VPN Phone : Disabled perpetual
Advanced Endpoint Assessment : Enabled perpetual
UC Phone Proxy Sessions : 10 perpetual
Total UC Proxy Sessions : 10 perpetual
Botnet Traffic Filter : Enabled perpetual
Intercompany Media Engine : Enabled perpetual
This platform has an ASA 5520 VPN Plus license.
Use the following steps to configure botnet traffic filtering:
Step 1: Configure the dynamic database.
Step 2: Configure the static database.
Step 3: Enable DNS snooping.
Step 4: Enable the Botnet Traffic Filter.
ciscoasa(config)# dynamic-filter ?
configure mode commands/options:
ambiguous-is-black Handle (ambiguous) greylist matched traffic as blacklist
for Dynamic Filter drop
blacklist Configure Dynamic Filter blacklist
drop Enable traffic drop based on Dynamic Filter traffic
classification
enable Enable Dynamic Filter classification
updater-client Configure Dynamic Filter updater client
use-database Use Dynamic Filter data downloaded from updater-server
whitelist Configure Dynamic Filter whitelist
exec mode commands/options:
database Dynamic Filter data commands
ciscoasa(config)# dynamic-filter updater-client ?
configure mode commands/options:
enable Enable Dynamic Filter updater client
ciscoasa(config)# dynamic-filter updater-client enable
WARNING: Can't resolve update-manifests.ironport.com, make sure dns nameserver is configured // CISCO'S DYNAMIC DATABASE UPDATE
ciscoasa(config)# dynamic-filter use-database
ciscoasa(config)# dns ? // CONFIGURE DNS AS PER ERROR GIVEN
configure mode commands/options:
domain-lookup Enable/Disable DNS host-to-address translation
expire-entry-timer Specify DNS entry expire timer
name-server Specify DNS servers
poll-timer Specify dns update interval
retries Configure DNS retries
server-group Configure a DNS server group
timeout Configure DNS query timeout
ciscoasa(config)# dns domain-lookup outside
ciscoasa(config)# dns server-group MY-DNS-GROUP
ciscoasa(config-dns-server-group)# ?
DNS server group commands:
domain-name Domain name to append to DNS queries for this server group
name-server Specify DNS servers
no Remove a server-group command or set to its default
retries DNS retries
timeout DNS query timeout
ciscoasa(config-dns-server-group)# name-server 4.2.2.2
ciscoasa(config)# dynamic-filter blacklist
ciscoasa(config-llist)# ?
Dynamic Filter list configuration
address Add IP address to local list
name Add domain name to local list
no Negate a command
ciscoasa(config-llist)# name ?
dynamic-filter-list mode commands/options:
WORD < 256 char Enter domain name
configure mode commands/options:
A.B.C.D The IPv4 address of the host/network being named
X:X:X:X::X The IPv6 address of the host/network being named
ciscoasa(config-llist)# name www.badsite.com
ciscoasa(config-llist)#exit
ciscoasa(config)# dynamic-filter whitelist
ciscoasa(config-llist)# name www.goodsite.com
ciscoasa(config-llist)#exit
ciscoasa(config)# policy-map ?
configure mode commands/options:
type Specifies the type of policy-map
Policy-map names:
global_policy
WORD < 41 char New policy-map name
ciscoasa(config-pmap)# policy-map global_policy
ciscoasa(config-pmap)# class ?
mpf-policy-map mode commands/options:
WORD class-map name
class-default System default class matching otherwise unclassified packets
configure mode commands/options:
WORD < 41 char class-map name
type Specifies the type of class-map
ciscoasa(config-pmap)# class inspection_default
ciscoasa(config-pmap-c)# ?
MPF policy-map class configuration commands:
exit Exit from MPF class action configuration mode
help Help for MPF policy-map class/match submode commands
no Negate or set default values of a command
police Rate limit traffic for this class
priority Strict scheduling priority for this class
quit Exit from MPF class action configuration mode
service-policy Configure QoS Service Policy
set Set connection values
shape Traffic Shaping
user-statistics configure user statistics for identity firewall
<cr>
csc Content Security and Control service module
flow-export Configure filters for NetFlow events
inspect Protocol inspection services
ips Intrusion prevention services
ciscoasa(config-pmap-c)# inspect ?
mpf-policy-map-class mode commands/options:
ctiqbe
dcerpc
dns
esmtp
ftp
gtp
h323
http
icmp
ils
im
ip-options
ipsec-pass-thru
ipv6
mgcp
mmp
netbios
pptp
rsh
rtsp
sip
skinny
snmp
ciscoasa(config-pmap-c)# inspect dns ?
mpf-policy-map-class mode commands/options:
WORD < 41 char Optional DNS type policy-map name
dynamic-filter-snoop Enable DNS snooping for Dynamic Filter
<cr>
ciscoasa(config-pmap-c)# inspect dns preset_dns_map ?
mpf-policy-map-class mode commands/options:
dynamic-filter-snoop Enable DNS snooping for Dynamic Filter
<cr>
ciscoasa(config-pmap-c)# inspect dns preset_dns_map dynamic-filter-snoop
ciscoasa(config-pmap-c)# exit
ciscoasa(config-pmap)# exit
ciscoasa(config)# dynamic-filter enable ?
configure mode commands/options:
classify-list Set the access-list for classification
interface Enable classification on an interface
<cr>
ciscoasa(config)# dynamic-filter enable interface ?
configure mode commands/options:
Current available interface(s):
inside Name of interface GigabitEthernet0
outside Name of interface GigabitEthernet1
ciscoasa(config)# dynamic-filter enable interface outside?
configure mode commands/options:
classify-list Set the access-list for classification
<cr>
ciscoasa(config)# dynamic-filter enable interface outside classify-list ?
configure mode commands/options:
WORD Specify the name of an access-list
ciscoasa(config)# dynamic-filter enable interface outside classify-list BOTNET_ACL
ciscoasa(config)# dynamic-filter drop ?
configure mode commands/options:
blacklist Drop traffic matching blacklist
ciscoasa(config)# dynamic-filter drop blacklist ?
configure mode commands/options:
action-classify-list Set the access-list for drop
interface Enable drop on an interface
threat-level Set the threat-level for drop
<cr>
ciscoasa(config)# dynamic-filter drop blacklist interface ?
configure mode commands/options:
Current available interface(s):
inside Name of interface GigabitEthernet0
outside Name of interface GigabitEthernet1
ciscoasa(config)# dynamic-filter drop blacklist interface outside ?
configure mode commands/options:
action-classify-list Set the access-list for drop
threat-level Set the threat-level for drop
<cr>
ciscoasa(config)# dynamic-filter drop blacklist interface outside action-classify-list ?
configure mode commands/options:
WORD Specify the name of an access-list
ciscoasa(config)# dynamic-filter drop blacklist interface outside action-classify-list BOTNET_ACL ?
configure mode commands/options:
threat-level Set the threat-level for drop
<cr>
ciscoasa(config)# dynamic-filter drop blacklist interface outside action-classify-list BOTNET_ACL threat-level ?
configure mode commands/options:
eq Threat-level equal to operator
range Threat-level range operator
ciscoasa(config)# dynamic-filter drop blacklist interface outside action-classify-list BOTNET_ACL threat-level eq ?
configure mode commands/options:
high high threat
low Low threat
moderate moderate threat
very-high Highest threat
very-low lowest threat
ciscoasa(config)# dynamic-filter drop blacklist interface outside action-classify-list BOTNET_ACL threat-level eq very-high
Because the infected hosts are located on a secure side of the ASA, they are likely to be free to open outbound connections just like any other protected host. You can leverage the Cisco ASA Botnet Traffic Filter feature to detect botnet activity and prevent infected hosts from contacting their control servers.
When the Botnet Traffic Filter is enabled, an ASA maintains two reputation databases:
* A dynamic SensorBase database that is downloaded periodically from Cisco, which contains information about known botnet control servers.
* A static database that you can populate, which can contain a "whitelist" of known good IP addresses and domain names or a "blacklist" of known bad servers.
The Botnet Traffic Filter feature is dependent upon four things:
* A Botnet Traffic Filter license purchased from Cisco and installed on the ASA
* A DNS server, which the ASA uses to lookup names and addresses in the static database
* Botnet Traffic Filter DNS snooping, which enables the ASA to intercept DNS queries from infected hosts and match against hostnames it finds in the databases
* Live connectivity to the Internet, so that the Botnet Traffic Filter feature can communicate with Cisco
Before you begin configuring Botnet Traffic Filtering, verify that the feature license has been enabled. You can use the show version command to see a list of ASA features and their license status. Make sure Botnet Traffic Filter is listed as Enabled
ciscoasa# show version
Cisco Adaptive Security Appliance Software Version 8.4(2)
Compiled on Wed 15-Jun-11 18:17 by builders
System image file is "Unknown, monitor mode tftp booted image"
Config file at boot was "startup-config"
ciscoasa up 11 mins 39 secs
Hardware: ASA 5520, 1024 MB RAM, CPU Pentium II 1000 MHz
Internal ATA Compact Flash, 256MB
BIOS Flash unknown @ 0x0, 0KB
0: Ext: GigabitEthernet0 : address is 00ab.cd92.5200, irq 0
1: Ext: GigabitEthernet1 : address is 0000.abf1.d701, irq 0
2: Ext: GigabitEthernet2 : address is 0000.ab9a.0e02, irq 0
3: Ext: GigabitEthernet3 : address is 0000.ab64.2f03, irq 0
4: Ext: GigabitEthernet4 : address is 0000.ab84.7804, irq 0
5: Ext: GigabitEthernet5 : address is 0000.abfa.5105, irq 0
Licensed features for this platform:
Maximum Physical Interfaces : Unlimited perpetual
Maximum VLANs : 100 perpetual
Inside Hosts : Unlimited perpetual
Failover : Active/Active perpetual
VPN-DES : Enabled perpetual
VPN-3DES-AES : Enabled perpetual
Security Contexts : 5 perpetual
GTP/GPRS : Disabled perpetual
AnyConnect Premium Peers : 25 perpetual
AnyConnect Essentials : Disabled perpetual
Other VPN Peers : 5000 perpetual
Total VPN Peers : 0 perpetual
Shared License : Enabled perpetual
AnyConnect for Mobile : Disabled perpetual
AnyConnect for Cisco VPN Phone : Disabled perpetual
Advanced Endpoint Assessment : Enabled perpetual
UC Phone Proxy Sessions : 10 perpetual
Total UC Proxy Sessions : 10 perpetual
Botnet Traffic Filter : Enabled perpetual
Intercompany Media Engine : Enabled perpetual
This platform has an ASA 5520 VPN Plus license.
Use the following steps to configure botnet traffic filtering:
Step 1: Configure the dynamic database.
Step 2: Configure the static database.
Step 3: Enable DNS snooping.
Step 4: Enable the Botnet Traffic Filter.
ciscoasa(config)# dynamic-filter ?
configure mode commands/options:
ambiguous-is-black Handle (ambiguous) greylist matched traffic as blacklist
for Dynamic Filter drop
blacklist Configure Dynamic Filter blacklist
drop Enable traffic drop based on Dynamic Filter traffic
classification
enable Enable Dynamic Filter classification
updater-client Configure Dynamic Filter updater client
use-database Use Dynamic Filter data downloaded from updater-server
whitelist Configure Dynamic Filter whitelist
exec mode commands/options:
database Dynamic Filter data commands
ciscoasa(config)# dynamic-filter updater-client ?
configure mode commands/options:
enable Enable Dynamic Filter updater client
ciscoasa(config)# dynamic-filter updater-client enable
WARNING: Can't resolve update-manifests.ironport.com, make sure dns nameserver is configured // CISCO'S DYNAMIC DATABASE UPDATE
ciscoasa(config)# dynamic-filter use-database
ciscoasa(config)# dns ? // CONFIGURE DNS AS PER ERROR GIVEN
configure mode commands/options:
domain-lookup Enable/Disable DNS host-to-address translation
expire-entry-timer Specify DNS entry expire timer
name-server Specify DNS servers
poll-timer Specify dns update interval
retries Configure DNS retries
server-group Configure a DNS server group
timeout Configure DNS query timeout
ciscoasa(config)# dns domain-lookup outside
ciscoasa(config)# dns server-group MY-DNS-GROUP
ciscoasa(config-dns-server-group)# ?
DNS server group commands:
domain-name Domain name to append to DNS queries for this server group
name-server Specify DNS servers
no Remove a server-group command or set to its default
retries DNS retries
timeout DNS query timeout
ciscoasa(config-dns-server-group)# name-server 4.2.2.2
ciscoasa(config)# dynamic-filter blacklist
ciscoasa(config-llist)# ?
Dynamic Filter list configuration
address Add IP address to local list
name Add domain name to local list
no Negate a command
ciscoasa(config-llist)# name ?
dynamic-filter-list mode commands/options:
WORD < 256 char Enter domain name
configure mode commands/options:
A.B.C.D The IPv4 address of the host/network being named
X:X:X:X::X The IPv6 address of the host/network being named
ciscoasa(config-llist)# name www.badsite.com
ciscoasa(config-llist)#exit
ciscoasa(config)# dynamic-filter whitelist
ciscoasa(config-llist)# name www.goodsite.com
ciscoasa(config-llist)#exit
ciscoasa(config)# policy-map ?
configure mode commands/options:
type Specifies the type of policy-map
Policy-map names:
global_policy
WORD < 41 char New policy-map name
ciscoasa(config-pmap)# policy-map global_policy
ciscoasa(config-pmap)# class ?
mpf-policy-map mode commands/options:
WORD class-map name
class-default System default class matching otherwise unclassified packets
configure mode commands/options:
WORD < 41 char class-map name
type Specifies the type of class-map
ciscoasa(config-pmap)# class inspection_default
ciscoasa(config-pmap-c)# ?
MPF policy-map class configuration commands:
exit Exit from MPF class action configuration mode
help Help for MPF policy-map class/match submode commands
no Negate or set default values of a command
police Rate limit traffic for this class
priority Strict scheduling priority for this class
quit Exit from MPF class action configuration mode
service-policy Configure QoS Service Policy
set Set connection values
shape Traffic Shaping
user-statistics configure user statistics for identity firewall
<cr>
csc Content Security and Control service module
flow-export Configure filters for NetFlow events
inspect Protocol inspection services
ips Intrusion prevention services
ciscoasa(config-pmap-c)# inspect ?
mpf-policy-map-class mode commands/options:
ctiqbe
dcerpc
dns
esmtp
ftp
gtp
h323
http
icmp
ils
im
ip-options
ipsec-pass-thru
ipv6
mgcp
mmp
netbios
pptp
rsh
rtsp
sip
skinny
snmp
ciscoasa(config-pmap-c)# inspect dns ?
mpf-policy-map-class mode commands/options:
WORD < 41 char Optional DNS type policy-map name
dynamic-filter-snoop Enable DNS snooping for Dynamic Filter
<cr>
ciscoasa(config-pmap-c)# inspect dns preset_dns_map ?
mpf-policy-map-class mode commands/options:
dynamic-filter-snoop Enable DNS snooping for Dynamic Filter
<cr>
ciscoasa(config-pmap-c)# inspect dns preset_dns_map dynamic-filter-snoop
ciscoasa(config-pmap-c)# exit
ciscoasa(config-pmap)# exit
ciscoasa(config)# dynamic-filter enable ?
configure mode commands/options:
classify-list Set the access-list for classification
interface Enable classification on an interface
<cr>
ciscoasa(config)# dynamic-filter enable interface ?
configure mode commands/options:
Current available interface(s):
inside Name of interface GigabitEthernet0
outside Name of interface GigabitEthernet1
ciscoasa(config)# dynamic-filter enable interface outside?
configure mode commands/options:
classify-list Set the access-list for classification
<cr>
ciscoasa(config)# dynamic-filter enable interface outside classify-list ?
configure mode commands/options:
WORD Specify the name of an access-list
ciscoasa(config)# dynamic-filter enable interface outside classify-list BOTNET_ACL
ciscoasa(config)# dynamic-filter drop ?
configure mode commands/options:
blacklist Drop traffic matching blacklist
ciscoasa(config)# dynamic-filter drop blacklist ?
configure mode commands/options:
action-classify-list Set the access-list for drop
interface Enable drop on an interface
threat-level Set the threat-level for drop
<cr>
ciscoasa(config)# dynamic-filter drop blacklist interface ?
configure mode commands/options:
Current available interface(s):
inside Name of interface GigabitEthernet0
outside Name of interface GigabitEthernet1
ciscoasa(config)# dynamic-filter drop blacklist interface outside ?
configure mode commands/options:
action-classify-list Set the access-list for drop
threat-level Set the threat-level for drop
<cr>
ciscoasa(config)# dynamic-filter drop blacklist interface outside action-classify-list ?
configure mode commands/options:
WORD Specify the name of an access-list
ciscoasa(config)# dynamic-filter drop blacklist interface outside action-classify-list BOTNET_ACL ?
configure mode commands/options:
threat-level Set the threat-level for drop
<cr>
ciscoasa(config)# dynamic-filter drop blacklist interface outside action-classify-list BOTNET_ACL threat-level ?
configure mode commands/options:
eq Threat-level equal to operator
range Threat-level range operator
ciscoasa(config)# dynamic-filter drop blacklist interface outside action-classify-list BOTNET_ACL threat-level eq ?
configure mode commands/options:
high high threat
low Low threat
moderate moderate threat
very-high Highest threat
very-low lowest threat
ciscoasa(config)# dynamic-filter drop blacklist interface outside action-classify-list BOTNET_ACL threat-level eq very-high
Sunday, October 27, 2013
Controlling Bandwidth on an ASA: Traffic Policing and Shaping
You can leverage two ASA features to control or limit the amount of bandwidth used by specific traffic flows:
* Traffic policing
* Traffic shaping
With either method, the ASA measures the bandwidth used by traffic that is classified by a service policy and then attempts to hold the traffic within a configured rate limit. However, each method accomplishes the bandwidth control in a different manner.
With traffic policing, the packets are forwarded normally as long as the bandwidth threshold is not exceeded. However, packets that do exceed the bandwidth threshold are simply dropped.
In contrast, traffic shaping takes a more preemptive approach. Traffic is buffered before it is forwarded so that the traffic rate can be shaped or held within the threshold limit. The idea is to pull packets from the buffer at a rate that is less than the threshold so that no packets are dropped.
To use ASDM to configure traffic policing, begin by navigating to Configuration > Firewall > Service Policy Rules and adding a new service policy rule or editing an existing one. Define a matching condition that will classify the traffic that will be policed. Next, click the QoS tab in the Rule Action dialog box. Check the Enable Policing check box, and then choose either Input Policing or Output policing.
Use the police command as the action to send the matched traffic into a traffic policer.
ciscoasa(config)# access-list OUTBOUND_HTTP extended permit tcp any eq http any
ciscoasa(config)# class-map CLASS_HTTP
ciscoasa(config-cmap)# match ?
mpf-class-map mode commands/options:
access-list Match an Access List
any Match any packet
default-inspection-traffic Match default inspection traffic:
ctiqbe----tcp--2748 dns-------udp--53
ftp-------tcp--21 gtp-------udp--2123,3386
h323-h225-tcp--1720 h323-ras--udp--1718-1719
http------tcp--80 icmp------icmp
ils-------tcp--389 ip-options-----rsvp
mgcp------udp--2427,2727 netbios---udp--137-138
radius-acct----udp--1646 rpc-------udp--111
rsh-------tcp--514 rtsp------tcp--554
sip-------tcp--5060 sip-------udp--5060
skinny----tcp--2000 smtp------tcp--25
sqlnet----tcp--1521 tftp------udp--69
waas------tcp--1-65535 xdmcp-----udp--177
dscp Match IP DSCP (DiffServ CodePoints)
flow Flow based Policy
port Match TCP/UDP port(s)
precedence Match IP precedence
rtp Match RTP port numbers
tunnel-group Match a Tunnel Group
ciscoasa(config-cmap)# match access-list ?
mpf-class-map mode commands/options:
WORD Access List name
ciscoasa(config-cmap)# match access-list OUTBOUND_HTTP
ciscoasa(config-cmap)# exit
ciscoasa(config)# policy-map MY_POLICY
ciscoasa(config-pmap)# ?
MPF policy-map configuration commands
class Policy criteria
description Specify policy-map description
exit Exit from MPF policy-map configuration mode
help Help for MPF policy-map configuration commands
no Negate or set default values of a command
rename Rename this policy-map
<cr>
ciscoasa(config-pmap)# class CLASS_HTTP
ciscoasa(config-pmap-c)# ?
MPF policy-map class configuration commands:
exit Exit from MPF class action configuration mode
help Help for MPF policy-map class/match submode commands
no Negate or set default values of a command
police Rate limit traffic for this class
priority Strict scheduling priority for this class
quit Exit from MPF class action configuration mode
service-policy Configure QoS Service Policy
set Set connection values
shape Traffic Shaping
user-statistics configure user statistics for identity firewall
<cr>
csc Content Security and Control service module
flow-export Configure filters for NetFlow events
inspect Protocol inspection services
ips Intrusion prevention services
ciscoasa(config-pmap-c)# police ?
mpf-policy-map-class mode commands/options:
input Police traffic in input direction
output Police traffic in output direction
ciscoasa(config-pmap-c)# police output ?
mpf-policy-map-class mode commands/options:
<8000-2000000000> Bits per second
ciscoasa(config-pmap-c)# police output 1000000 ?
mpf-policy-map-class mode commands/options:
<1000-512000000> Burst bytes
conform-action action when rate is less than conform burst
<cr>
ciscoasa(config-pmap-c)# police output 1000000 conform-action ?
mpf-policy-map-class mode commands/options:
drop drop packet
exceed-action action when rate is within conform and conform + exceed burst
transmit transmit packet
<cr>
ciscoasa(config-pmap-c)# police output 1000000 conform-action transmit ?
mpf-policy-map-class mode commands/options:
exceed-action action when rate is within conform and conform + exceed burst
<cr>
ciscoasa(config-pmap-c)# police output 1000000 conform-action transmit exceed-action ?
mpf-policy-map-class mode commands/options:
drop drop packet
transmit transmit packet
<cr>
ciscoasa(config-pmap-c)# police output 1000000 conform-action transmit exceed-action drop
ciscoasa(config-pmap-c)# exit
ciscoasa(config-pmap)# exit
ciscoasa(config)# service-policy MY_POLICY ?
configure mode commands/options:
global Enter this keyword to specify a global policy
interface Enter this keyword to specify an interface policy
ciscoasa(config)# service-policy MY_POLICY interface ?
configure mode commands/options:
Current available interface(s):
dmz Name of interface GigabitEthernet1
inside Name of interface GigabitEthernet0
outside Name of interface GigabitEthernet2
ciscoasa(config)# service-policy MY_POLICY interface outside
To configure traffic shaping in ASDM, begin by adding a new service policy rule or edit an existing one. Traffic shaping doesn't shape specific matched traffic; it shapes the default traffic that isn't matched or classified by any other traffic class. Therefore, you have to use the class-default class map to match the traffic. This is done by selecting the Use Class-Default As the Traffic Class option in the Traffic Classification Criteria dialog box.
Next, click the QoS tab in the Rule Actions dialog box and check Enable Traffic Shaping as the policy action. If you choose any matching criteria other than class-default, the Enable Traffic Shaping option will not be shown.
You can use the shape command as the action to send the matched traffic into a traffic shaper. Traffic shaping can be applied only to the bulk amount of traffic passing through an interface. Therefore, the matching condition you enter into the policy map configuration is important. The only permissible command is class class-default, followed by the shape command action.
ciscoasa(config)# policy-map outside-policy
ciscoasa(config-pmap)# class ?
mpf-policy-map mode commands/options:
WORD class-map name
class-default System default class matching otherwise unclassified packets
configure mode commands/options:
WORD < 41 char class-map name
type Specifies the type of class-map
ciscoasa(config-pmap)# class class-default
ciscoasa(config-pmap-c)# ?
MPF policy-map class configuration commands:
exit Exit from MPF class action configuration mode
help Help for MPF policy-map class/match submode commands
no Negate or set default values of a command
police Rate limit traffic for this class
priority Strict scheduling priority for this class
quit Exit from MPF class action configuration mode
service-policy Configure QoS Service Policy
set Set connection values
shape Traffic Shaping
user-statistics configure user statistics for identity firewall
<cr>
csc Content Security and Control service module
flow-export Configure filters for NetFlow events
inspect Protocol inspection services
ips Intrusion prevention services
ciscoasa(config-pmap-c)# shape ?
mpf-policy-map-class mode commands/options:
average configure token bucket: CIR (bps) [Bc (bits)], send out Bc only per
interval
ciscoasa(config-pmap-c)# shape average ?
mpf-policy-map-class mode commands/options:
<64000-154400000> Target Bit Rate (bits per second), the value needs to be
multiple of 8000
ciscoasa(config-pmap-c)# shape average 100000000
ciscoasa(config-pmap-c)# exit
ciscoasa(config-pmap)# exit
ciscoasa(config)# service-policy ?
configure mode commands/options:
Available policy-maps:
outside-policy
ciscoasa(config)# service-policy outside-policy interface ?
configure mode commands/options:
Current available interface(s):
dmz Name of interface GigabitEthernet1
inside Name of interface GigabitEthernet0
outside Name of interface GigabitEthernet2
ciscoasa(config)# service-policy outside-policy interface outside
* Traffic policing
* Traffic shaping
With either method, the ASA measures the bandwidth used by traffic that is classified by a service policy and then attempts to hold the traffic within a configured rate limit. However, each method accomplishes the bandwidth control in a different manner.
With traffic policing, the packets are forwarded normally as long as the bandwidth threshold is not exceeded. However, packets that do exceed the bandwidth threshold are simply dropped.
In contrast, traffic shaping takes a more preemptive approach. Traffic is buffered before it is forwarded so that the traffic rate can be shaped or held within the threshold limit. The idea is to pull packets from the buffer at a rate that is less than the threshold so that no packets are dropped.
To use ASDM to configure traffic policing, begin by navigating to Configuration > Firewall > Service Policy Rules and adding a new service policy rule or editing an existing one. Define a matching condition that will classify the traffic that will be policed. Next, click the QoS tab in the Rule Action dialog box. Check the Enable Policing check box, and then choose either Input Policing or Output policing.
Use the police command as the action to send the matched traffic into a traffic policer.
ciscoasa(config)# access-list OUTBOUND_HTTP extended permit tcp any eq http any
ciscoasa(config)# class-map CLASS_HTTP
ciscoasa(config-cmap)# match ?
mpf-class-map mode commands/options:
access-list Match an Access List
any Match any packet
default-inspection-traffic Match default inspection traffic:
ctiqbe----tcp--2748 dns-------udp--53
ftp-------tcp--21 gtp-------udp--2123,3386
h323-h225-tcp--1720 h323-ras--udp--1718-1719
http------tcp--80 icmp------icmp
ils-------tcp--389 ip-options-----rsvp
mgcp------udp--2427,2727 netbios---udp--137-138
radius-acct----udp--1646 rpc-------udp--111
rsh-------tcp--514 rtsp------tcp--554
sip-------tcp--5060 sip-------udp--5060
skinny----tcp--2000 smtp------tcp--25
sqlnet----tcp--1521 tftp------udp--69
waas------tcp--1-65535 xdmcp-----udp--177
dscp Match IP DSCP (DiffServ CodePoints)
flow Flow based Policy
port Match TCP/UDP port(s)
precedence Match IP precedence
rtp Match RTP port numbers
tunnel-group Match a Tunnel Group
ciscoasa(config-cmap)# match access-list ?
mpf-class-map mode commands/options:
WORD Access List name
ciscoasa(config-cmap)# match access-list OUTBOUND_HTTP
ciscoasa(config-cmap)# exit
ciscoasa(config)# policy-map MY_POLICY
ciscoasa(config-pmap)# ?
MPF policy-map configuration commands
class Policy criteria
description Specify policy-map description
exit Exit from MPF policy-map configuration mode
help Help for MPF policy-map configuration commands
no Negate or set default values of a command
rename Rename this policy-map
<cr>
ciscoasa(config-pmap)# class CLASS_HTTP
ciscoasa(config-pmap-c)# ?
MPF policy-map class configuration commands:
exit Exit from MPF class action configuration mode
help Help for MPF policy-map class/match submode commands
no Negate or set default values of a command
police Rate limit traffic for this class
priority Strict scheduling priority for this class
quit Exit from MPF class action configuration mode
service-policy Configure QoS Service Policy
set Set connection values
shape Traffic Shaping
user-statistics configure user statistics for identity firewall
<cr>
csc Content Security and Control service module
flow-export Configure filters for NetFlow events
inspect Protocol inspection services
ips Intrusion prevention services
ciscoasa(config-pmap-c)# police ?
mpf-policy-map-class mode commands/options:
input Police traffic in input direction
output Police traffic in output direction
ciscoasa(config-pmap-c)# police output ?
mpf-policy-map-class mode commands/options:
<8000-2000000000> Bits per second
ciscoasa(config-pmap-c)# police output 1000000 ?
mpf-policy-map-class mode commands/options:
<1000-512000000> Burst bytes
conform-action action when rate is less than conform burst
<cr>
ciscoasa(config-pmap-c)# police output 1000000 conform-action ?
mpf-policy-map-class mode commands/options:
drop drop packet
exceed-action action when rate is within conform and conform + exceed burst
transmit transmit packet
<cr>
ciscoasa(config-pmap-c)# police output 1000000 conform-action transmit ?
mpf-policy-map-class mode commands/options:
exceed-action action when rate is within conform and conform + exceed burst
<cr>
ciscoasa(config-pmap-c)# police output 1000000 conform-action transmit exceed-action ?
mpf-policy-map-class mode commands/options:
drop drop packet
transmit transmit packet
<cr>
ciscoasa(config-pmap-c)# police output 1000000 conform-action transmit exceed-action drop
ciscoasa(config-pmap-c)# exit
ciscoasa(config-pmap)# exit
ciscoasa(config)# service-policy MY_POLICY ?
configure mode commands/options:
global Enter this keyword to specify a global policy
interface Enter this keyword to specify an interface policy
ciscoasa(config)# service-policy MY_POLICY interface ?
configure mode commands/options:
Current available interface(s):
dmz Name of interface GigabitEthernet1
inside Name of interface GigabitEthernet0
outside Name of interface GigabitEthernet2
ciscoasa(config)# service-policy MY_POLICY interface outside
To configure traffic shaping in ASDM, begin by adding a new service policy rule or edit an existing one. Traffic shaping doesn't shape specific matched traffic; it shapes the default traffic that isn't matched or classified by any other traffic class. Therefore, you have to use the class-default class map to match the traffic. This is done by selecting the Use Class-Default As the Traffic Class option in the Traffic Classification Criteria dialog box.
Next, click the QoS tab in the Rule Actions dialog box and check Enable Traffic Shaping as the policy action. If you choose any matching criteria other than class-default, the Enable Traffic Shaping option will not be shown.
You can use the shape command as the action to send the matched traffic into a traffic shaper. Traffic shaping can be applied only to the bulk amount of traffic passing through an interface. Therefore, the matching condition you enter into the policy map configuration is important. The only permissible command is class class-default, followed by the shape command action.
ciscoasa(config)# policy-map outside-policy
ciscoasa(config-pmap)# class ?
mpf-policy-map mode commands/options:
WORD class-map name
class-default System default class matching otherwise unclassified packets
configure mode commands/options:
WORD < 41 char class-map name
type Specifies the type of class-map
ciscoasa(config-pmap)# class class-default
ciscoasa(config-pmap-c)# ?
MPF policy-map class configuration commands:
exit Exit from MPF class action configuration mode
help Help for MPF policy-map class/match submode commands
no Negate or set default values of a command
police Rate limit traffic for this class
priority Strict scheduling priority for this class
quit Exit from MPF class action configuration mode
service-policy Configure QoS Service Policy
set Set connection values
shape Traffic Shaping
user-statistics configure user statistics for identity firewall
<cr>
csc Content Security and Control service module
flow-export Configure filters for NetFlow events
inspect Protocol inspection services
ips Intrusion prevention services
ciscoasa(config-pmap-c)# shape ?
mpf-policy-map-class mode commands/options:
average configure token bucket: CIR (bps) [Bc (bits)], send out Bc only per
interval
ciscoasa(config-pmap-c)# shape average ?
mpf-policy-map-class mode commands/options:
<64000-154400000> Target Bit Rate (bits per second), the value needs to be
multiple of 8000
ciscoasa(config-pmap-c)# shape average 100000000
ciscoasa(config-pmap-c)# exit
ciscoasa(config-pmap)# exit
ciscoasa(config)# service-policy ?
configure mode commands/options:
Available policy-maps:
outside-policy
ciscoasa(config)# service-policy outside-policy interface ?
configure mode commands/options:
Current available interface(s):
dmz Name of interface GigabitEthernet1
inside Name of interface GigabitEthernet0
outside Name of interface GigabitEthernet2
ciscoasa(config)# service-policy outside-policy interface outside
Saturday, October 19, 2013
Configuring Virtual Firewall on an ASA
Limitations
Here are some important limitations regarding virtual firewalls on a Cisco ASA:
* Key features that are unsupported on a Cisco ASA in multiple mode are dynamic routing protocols, IPsec and SSL VPNs, multicast IP routing, threat detection, and Phone Proxy.
* The Cisco ASA 5505 does not support multiple mode. (This personally frustrates me).
* The number of Security Contexts you can create depends on the software licenses and the Cisco ASA hardware model used.
I had a discussion with our core design engineer and he mentioned that we should be able to run IPsec site-to-site VPNs on context-based firewalls. And sure enough after doing some research, Cisco has finally released a code to support this feature.
As of ASA code 9.0+, there's been an enhancement to support some of these features especially on Multi-Context VPN. Refer to useful links:
http://sevenlayers.wordpress.com/2012/09/13/cisco-multi-conext-vpn-is-finally-here-in-asa-release-9-0-a-few-years-too-late/
http://www.cisco.com/c/en/us/products/collateral/security/adaptive-security-appliance-asa-software/data_sheet_c78-714849.html
Configuration Tasks
Here is an overview for the configuration of virtual firewalls on the Cisco ASA.
Step 1: Enable multiple mode on the Cisco ASA.
Step 2: Create a Security Context.
Step 3: Allocate interfaces to the context.
Step 4: Specify the startup configuration location for the context.
Step 5: Configure the Security Context resource management.
Step 6: Configure each Security Context as a separate security appliance.
Licensed features for this platform:
Maximum Physical Interfaces : Unlimited perpetual
Maximum VLANs : 100 perpetual
Inside Hosts : Unlimited perpetual
Failover : Active/Active perpetual
VPN-DES : Enabled perpetual
VPN-3DES-AES : Enabled perpetual
Security Contexts : 2 perpetual // EXCLUDES SYSTEM AND ADMIN CONTEXT
GTP/GPRS : Disabled perpetual
AnyConnect Premium Peers : 5000 perpetual
AnyConnect Essentials : Disabled perpetual
Other VPN Peers : 5000 perpetual
Total VPN Peers : 0 perpetual
Shared License : Disabled perpetual
AnyConnect for Mobile : Disabled perpetual
AnyConnect for Cisco VPN Phone : Disabled perpetual
Advanced Endpoint Assessment : Disabled perpetual
UC Phone Proxy Sessions : 2 perpetual
Total UC Proxy Sessions : 2 perpetual
Botnet Traffic Filter : Disabled perpetual
Intercompany Media Engine : Disabled perpetual
This platform has an ASA 5520 VPN Plus license.
ciscoasa# configure terminal
ciscoasa(config)# mode ?
configure mode commands/options:
multiple Multiple mode; mode with security contexts
noconfirm Do not prompt for confirmation
single Single mode; mode without security contexts
ciscoasa(config)# mode multiple
WARNING: This command will change the behavior of the device
WARNING: This command will initiate a Reboot
Proceed with change mode? [confirm]
Convert the system configuration? [confirm]
!
The old running configuration file will be written to flash
Converting the configuration - this may take several minutes for a large configuration
The admin context configuration will be written to flash
The new running configuration file was written to flash
Security context mode: multiple
***
*** --- SHUTDOWN NOW ---
***
*** Message to all terminals:
***
*** change mode
REBOOT: open message queue fail: No such file or directory/2
REBOOT: enforce reboot...
Restarting system.
machine restart
<OUTPUT TRUNCATED>
ciscoasa# configure terminal
ciscoasa(config)# interface gigabitethernet0 // WE UNSHUT MAIN INTERFACES IN SYSTEM CONTEXT
ciscoasa(config-if)# ?
Interface configuration commands:
channel-group Etherchannel/port bundling configuration
default Set a command to its defaults
description Interface specific description
exit Exit from interface configuration mode
help Interactive help for interface subcommands
lacp LACP interface subcommands
no Negate a command or set its defaults
shutdown Shutdown the selected interface
ciscoasa(config-if)# no shutdown
ciscoasa(config-if)# interface gigabitethernet1
ciscoasa(config-if)# no shutdown
ciscoasa(config-if)# exit
ciscoasa(config)# context ?
configure mode commands/options:
WORD Symbolic name of the context
ciscoasa(config)# context CONTEXT-A
Creating context 'CONTEXT-A'... Done. (2)
ciscoasa(config-ctx)# ?
Context configuration commands:
allocate-interface Allocate interface to context
allocate-ips Allocate IPS virtual sensor to context
config-url Configure URL for a context configuration
description Provide a description of the context
exit Exit from context configuration mode
help Interactive help for context subcommands
join-failover-group Join a context to a failover group
member Configure class membership for a context
no Negate a command
ciscoasa(config-ctx)# allocate-interface ?
context mode commands/options:
WORD Indicate interfaces assigned to the context
ciscoasa(config-ctx)# allocate-interface gigabitethernet0 ?
context mode commands/options:
WORD Optional interface name mapping for the context
invisible Optional flag for hiding hardware property in context (default)
visible Optional flag for publishing hardware property in context
<cr>
ciscoasa(config-ctx)# allocate-interface gigabitethernet0 intg0
ciscoasa(config-ctx)# allocate-interface gigabitethernet1 intg1
ciscoasa(config-ctx)# config-url ?
context mode commands/options:
disk0: A URL beginning with this prefix for the context's config (file need
not exist)
flash: A URL beginning with this prefix for the context's config (file need
not exist)
ftp: A URL beginning with this prefix for the context's config (file need
not exist)
http: A URL beginning with this prefix for the context's config (file need
not exist)
https: A URL beginning with this prefix for the context's config (file need
not exist)
smb: A URL beginning with this prefix for the context's config (file need
not exist)
tftp: A URL beginning with this prefix for the context's config (file need
not exist)
ciscoasa(config-ctx)# config-url disk0:/CONTEXT-A.cfg
WARNING: Could not fetch the URL disk0:/CONTEXT-A.cfg
INFO: Creating context with default config
ciscoasa/CONTEXT-A(config)# interface intg0
ciscoasa/CONTEXT-A(config-if)# ip address 192.168.1.1 255.255.255.0
ciscoasa/CONTEXT-A(config-if)# no shutdown
ciscoasa/CONTEXT-A(config-if)# nameif inside
INFO: Security level for "inside" set to 100 by default.
ciscoasa/CONTEXT-A(config-if)# interface intg1
ciscoasa/CONTEXT-A(config-if)# ip address 209.165.200.1 255.255.255.0
ciscoasa/CONTEXT-A(config-if)# no shutdown
ciscoasa/CONTEXT-A(config-if)# nameif outside
INFO: Security level for "outside" set to 0 by default.
ciscoasa(config-ctx)# exit
ciscoasa(config)# context CONTEXT-B
Creating context 'CONTEXT-B'... Done. (3)
ciscoasa(config-ctx)# allocate-interface gigabitethernet0 intg0
ciscoasa(config-ctx)# allocate-interface gigabitethernet1 intg1
ciscoasa/CONTEXT-B(config)# interface intg0
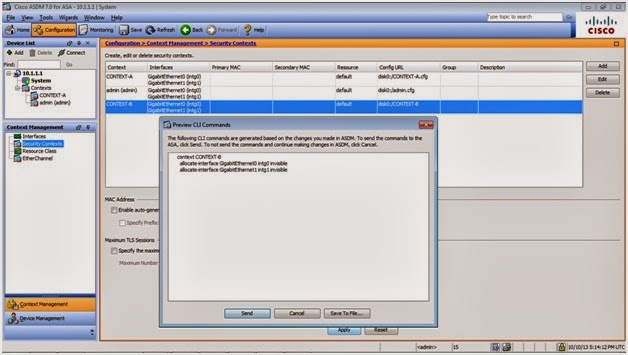
ciscoasa/CONTEXT-B(config-if)# ip address 172.16.1.1 255.255.255.0
ciscoasa/CONTEXT-B(config-if)# no shutdown
ciscoasa/CONTEXT-B(config-if)# nameif inside
INFO: Security level for "inside" set to 100 by default.
ciscoasa/CONTEXT-B(config-if)# interface intg1
ciscoasa/CONTEXT-B(config-if)# ip address 209.165.200.1 255.255.255.0
ERROR: This address conflicts with another address on net
ciscoasa/CONTEXT-B(config-if)# ip address 209.165.200.2 255.255.255.0
ciscoasa/CONTEXT-B(config-if)# no shutdown
ciscoasa/CONTEXT-B(config-if)# nameif outside
INFO: Security level for "outside" set to 0 by default.
ciscoasa(config-ctx)# config-url disk0:/CONTEXT-B.cfg
WARNING: Could not fetch the URL disk0:/CONTEXT-B.cfg
INFO: Creating context with default config
ciscoasa(config-ctx)# exit
ciscoasa(config)# admin-context ?
configure mode commands/options:
WORD Name of administrative context
ciscoasa(config)# admin-context admin // ASSIGN ADMIN CONTEXT AS "ADMIN" FOR REMOTE MANAGEMENT
ciscoasa(config)# context admin
ciscoasa(config-ctx)# config-url disk0:/admin.cfg
Cryptochecksum (changed): d9951253 3b82d2ce 840166f8 ccd3d7f1
INFO: Context admin was created with URL disk0:/admin.cfg
INFO: Admin context will take some time to come up .... please wait.
ciscoasa(config-ctx)# allocate-interface gigabitethernet0 intg0
ciscoasa(config-ctx)# allocate-interface gigabitethernet1 intg1
ciscoasa(config-ctx)# end
ciscoasa# changeto ?
context Change to context
system Change to system space
ciscoasa# changeto context ?
WORD Context name
ciscoasa# changeto context admin
ciscoasa/admin# configure terminal
ciscoasa/admin(config)# interface intg0
ciscoasa/admin(config-if)# ip address 10.1.1.1 255.255.255.0
ciscoasa/admin(config-if)# no shutdown
ciscoasa/admin(config-if)# nameif inside
INFO: Security level for "inside" set to 100 by default.
ciscoasa/admin(config-if)# exit
ciscoasa/admin(config)# http server enable
ciscoasa/admin(config)# http 0 0 inside // HTTPS/ASDM ACCESS FROM ANY IP SOURCE COMING FROM THE INSIDE INTERFACE
ciscoasa/admin(config)#end
Here are some important limitations regarding virtual firewalls on a Cisco ASA:
* Key features that are unsupported on a Cisco ASA in multiple mode are dynamic routing protocols, IPsec and SSL VPNs, multicast IP routing, threat detection, and Phone Proxy.
* The Cisco ASA 5505 does not support multiple mode. (This personally frustrates me).
* The number of Security Contexts you can create depends on the software licenses and the Cisco ASA hardware model used.
I had a discussion with our core design engineer and he mentioned that we should be able to run IPsec site-to-site VPNs on context-based firewalls. And sure enough after doing some research, Cisco has finally released a code to support this feature.
As of ASA code 9.0+, there's been an enhancement to support some of these features especially on Multi-Context VPN. Refer to useful links:
http://sevenlayers.wordpress.com/2012/09/13/cisco-multi-conext-vpn-is-finally-here-in-asa-release-9-0-a-few-years-too-late/
http://www.cisco.com/c/en/us/products/collateral/security/adaptive-security-appliance-asa-software/data_sheet_c78-714849.html
Configuration Tasks
Here is an overview for the configuration of virtual firewalls on the Cisco ASA.
Step 1: Enable multiple mode on the Cisco ASA.
Step 2: Create a Security Context.
Step 3: Allocate interfaces to the context.
Step 4: Specify the startup configuration location for the context.
Step 5: Configure the Security Context resource management.
Step 6: Configure each Security Context as a separate security appliance.
Licensed features for this platform:
Maximum Physical Interfaces : Unlimited perpetual
Maximum VLANs : 100 perpetual
Inside Hosts : Unlimited perpetual
Failover : Active/Active perpetual
VPN-DES : Enabled perpetual
VPN-3DES-AES : Enabled perpetual
Security Contexts : 2 perpetual // EXCLUDES SYSTEM AND ADMIN CONTEXT
GTP/GPRS : Disabled perpetual
AnyConnect Premium Peers : 5000 perpetual
AnyConnect Essentials : Disabled perpetual
Other VPN Peers : 5000 perpetual
Total VPN Peers : 0 perpetual
Shared License : Disabled perpetual
AnyConnect for Mobile : Disabled perpetual
AnyConnect for Cisco VPN Phone : Disabled perpetual
Advanced Endpoint Assessment : Disabled perpetual
UC Phone Proxy Sessions : 2 perpetual
Total UC Proxy Sessions : 2 perpetual
Botnet Traffic Filter : Disabled perpetual
Intercompany Media Engine : Disabled perpetual
This platform has an ASA 5520 VPN Plus license.
ciscoasa# configure terminal
ciscoasa(config)# mode ?
configure mode commands/options:
multiple Multiple mode; mode with security contexts
noconfirm Do not prompt for confirmation
single Single mode; mode without security contexts
ciscoasa(config)# mode multiple
WARNING: This command will change the behavior of the device
WARNING: This command will initiate a Reboot
Proceed with change mode? [confirm]
Convert the system configuration? [confirm]
!
The old running configuration file will be written to flash
Converting the configuration - this may take several minutes for a large configuration
The admin context configuration will be written to flash
The new running configuration file was written to flash
Security context mode: multiple
***
*** --- SHUTDOWN NOW ---
***
*** Message to all terminals:
***
*** change mode
REBOOT: open message queue fail: No such file or directory/2
REBOOT: enforce reboot...
Restarting system.
machine restart
<OUTPUT TRUNCATED>
ciscoasa# configure terminal
ciscoasa(config)# interface gigabitethernet0 // WE UNSHUT MAIN INTERFACES IN SYSTEM CONTEXT
ciscoasa(config-if)# ?
Interface configuration commands:
channel-group Etherchannel/port bundling configuration
default Set a command to its defaults
description Interface specific description
exit Exit from interface configuration mode
help Interactive help for interface subcommands
lacp LACP interface subcommands
no Negate a command or set its defaults
shutdown Shutdown the selected interface
ciscoasa(config-if)# no shutdown
ciscoasa(config-if)# interface gigabitethernet1
ciscoasa(config-if)# no shutdown
ciscoasa(config-if)# exit
ciscoasa(config)# context ?
configure mode commands/options:
WORD Symbolic name of the context
ciscoasa(config)# context CONTEXT-A
Creating context 'CONTEXT-A'... Done. (2)
ciscoasa(config-ctx)# ?
Context configuration commands:
allocate-interface Allocate interface to context
allocate-ips Allocate IPS virtual sensor to context
config-url Configure URL for a context configuration
description Provide a description of the context
exit Exit from context configuration mode
help Interactive help for context subcommands
join-failover-group Join a context to a failover group
member Configure class membership for a context
no Negate a command
ciscoasa(config-ctx)# allocate-interface ?
context mode commands/options:
WORD Indicate interfaces assigned to the context
ciscoasa(config-ctx)# allocate-interface gigabitethernet0 ?
context mode commands/options:
WORD Optional interface name mapping for the context
invisible Optional flag for hiding hardware property in context (default)
visible Optional flag for publishing hardware property in context
<cr>
ciscoasa(config-ctx)# allocate-interface gigabitethernet0 intg0
ciscoasa(config-ctx)# allocate-interface gigabitethernet1 intg1
ciscoasa(config-ctx)# config-url ?
context mode commands/options:
disk0: A URL beginning with this prefix for the context's config (file need
not exist)
flash: A URL beginning with this prefix for the context's config (file need
not exist)
ftp: A URL beginning with this prefix for the context's config (file need
not exist)
http: A URL beginning with this prefix for the context's config (file need
not exist)
https: A URL beginning with this prefix for the context's config (file need
not exist)
smb: A URL beginning with this prefix for the context's config (file need
not exist)
tftp: A URL beginning with this prefix for the context's config (file need
not exist)
ciscoasa(config-ctx)# config-url disk0:/CONTEXT-A.cfg
WARNING: Could not fetch the URL disk0:/CONTEXT-A.cfg
INFO: Creating context with default config
ciscoasa/CONTEXT-A(config)# interface intg0
ciscoasa/CONTEXT-A(config-if)# ip address 192.168.1.1 255.255.255.0
ciscoasa/CONTEXT-A(config-if)# no shutdown
ciscoasa/CONTEXT-A(config-if)# nameif inside
INFO: Security level for "inside" set to 100 by default.
ciscoasa/CONTEXT-A(config-if)# interface intg1
ciscoasa/CONTEXT-A(config-if)# ip address 209.165.200.1 255.255.255.0
ciscoasa/CONTEXT-A(config-if)# no shutdown
ciscoasa/CONTEXT-A(config-if)# nameif outside
INFO: Security level for "outside" set to 0 by default.
ciscoasa(config-ctx)# exit
ciscoasa(config)# context CONTEXT-B
Creating context 'CONTEXT-B'... Done. (3)
ciscoasa(config-ctx)# allocate-interface gigabitethernet0 intg0
ciscoasa(config-ctx)# allocate-interface gigabitethernet1 intg1
ciscoasa/CONTEXT-B(config)# interface intg0
ciscoasa/CONTEXT-B(config-if)# ip address 172.16.1.1 255.255.255.0
ciscoasa/CONTEXT-B(config-if)# no shutdown
ciscoasa/CONTEXT-B(config-if)# nameif inside
INFO: Security level for "inside" set to 100 by default.
ciscoasa/CONTEXT-B(config-if)# interface intg1
ciscoasa/CONTEXT-B(config-if)# ip address 209.165.200.1 255.255.255.0
ERROR: This address conflicts with another address on net
ciscoasa/CONTEXT-B(config-if)# ip address 209.165.200.2 255.255.255.0
ciscoasa/CONTEXT-B(config-if)# no shutdown
ciscoasa/CONTEXT-B(config-if)# nameif outside
INFO: Security level for "outside" set to 0 by default.
ciscoasa(config-ctx)# config-url disk0:/CONTEXT-B.cfg
WARNING: Could not fetch the URL disk0:/CONTEXT-B.cfg
INFO: Creating context with default config
ciscoasa(config-ctx)# exit
ciscoasa(config)# admin-context ?
configure mode commands/options:
WORD Name of administrative context
ciscoasa(config)# admin-context admin // ASSIGN ADMIN CONTEXT AS "ADMIN" FOR REMOTE MANAGEMENT
ciscoasa(config)# context admin
ciscoasa(config-ctx)# config-url disk0:/admin.cfg
Cryptochecksum (changed): d9951253 3b82d2ce 840166f8 ccd3d7f1
INFO: Context admin was created with URL disk0:/admin.cfg
INFO: Admin context will take some time to come up .... please wait.
ciscoasa(config-ctx)# allocate-interface gigabitethernet0 intg0
ciscoasa(config-ctx)# allocate-interface gigabitethernet1 intg1
ciscoasa(config-ctx)# end
ciscoasa# changeto ?
context Change to context
system Change to system space
ciscoasa# changeto context ?
WORD Context name
ciscoasa# changeto context admin
ciscoasa/admin# configure terminal
ciscoasa/admin(config)# interface intg0
ciscoasa/admin(config-if)# ip address 10.1.1.1 255.255.255.0
ciscoasa/admin(config-if)# no shutdown
ciscoasa/admin(config-if)# nameif inside
INFO: Security level for "inside" set to 100 by default.
ciscoasa/admin(config-if)# exit
ciscoasa/admin(config)# http server enable
ciscoasa/admin(config)# http 0 0 inside // HTTPS/ASDM ACCESS FROM ANY IP SOURCE COMING FROM THE INSIDE INTERFACE
ciscoasa/admin(config)#end
Saturday, October 12, 2013
Configuring Access Control List (ACL) on an ASA
The access control list (ACL) is the very heart of every ASA device. The ASA provides an administrator with a full-featured set of access control methods, allowing access between network segments to be tightly controlled.
You can configure an interface access rules in the CLI by using the access-list command. ACLs are made up of one or more access control entries (ACE), each represented by one line in the ACL, that specifying a permit or deny rule, or remark.
ciscoasa(config)# access-list ?
configure mode commands/options:
WORD < 241 char Access list identifier
alert-interval Specify the alert interval for generating syslog message
106001 which alerts that the system has reached a deny flow
maximum. If not specified, the default value is 300 sec
deny-flow-max Specify the maximum number of concurrent deny flows that can
be created. If not specified, the default value is 4096
ciscoasa(config)# access-list INSIDE-IN ?
configure mode commands/options:
deny Specify packets to reject
extended Configure access policy for IP traffic through the system
line Use this to specify line number at which ACE should be entered
permit Specify packets to forward
remark Specify a comment (remark) for the access-list after this keyword
rename rename an existing access-list
standard Use this to configure policy having destination host or network
only
webtype Use this to configure WebVPN related policy
ciscoasa(config)# access-list INSIDE-IN line 1 ?
configure mode commands/options:
deny Specify packets to reject
extended Configure access policy for IP traffic through the system
permit Specify packets to forward
remark Specify a comment (remark) for the access-list after this keyword
ciscoasa(config)# access-list INSIDE-IN line 1 extended ?
configure mode commands/options:
deny Specify packets to reject
permit Specify packets to forward
ciscoasa(config)# access-list INSIDE-IN line 1 extended permit ?
configure mode commands/options:
<0-255> Enter protocol number (0 - 255)
ah
eigrp
esp
gre
icmp
icmp6
igmp
igrp
ip
ipinip
ipsec
nos
object Specify a service object after this keyword
object-group Specify a service or protocol object-group after this keyword
ospf
pcp
pim
pptp
snp
tcp
udp
ciscoasa(config)# access-list INSIDE-IN line 1 extended permit tcp ?
configure mode commands/options:
A.B.C.D Source IP address
any Abbreviation for source address and mask of 0.0.0.0
0.0.0.0
host Use this keyword to configure source host
interface Use interface address as source address
object Keyword to enter source object name
object-group Network object-group for source address
object-group-user User object-group for source address
user User for source address [<domain_nickname>\]<user_name>
user-group User-group for source address
[<domain_nickname>\\]<user_group_name>
ciscoasa(config)# access-list INSIDE-IN line 1 extended permit tcp 10.0.0.0 ?
configure mode commands/options:
A.B.C.D Netmask for source IP address
ciscoasa(config)# access-list INSIDE-IN line 1 extended permit tcp 10.0.0.0 255.255.255.0 ?
configure mode commands/options:
A.B.C.D Destination IP address
any Abbreviation for destination address and mask of 0.0.0.0
0.0.0.0
eq Port equal to operator
gt Port greater than operator
host Use this keyword to configure destination host
interface Use interface address as destination address
lt Port less than operator
neq Port not equal to operator
object Keyword to enter destination object name
object-group Optional service object-group name for source port or network
object-group for destination address
range Port range operator
ciscoasa(config)# access-list INSIDE-IN line 1 extended permit tcp 10.0.0.0 255.255.255.0 any ?
configure mode commands/options:
eq Port equal to operator
gt Port greater than operator
inactive Keyword for disabling an ACL element
log Keyword for enabling log option on this ACL element
lt Port less than operator
neq Port not equal to operator
object-group Optional service object-group for destination port
range Port range operator
time-range Keyword for attaching time-range option to this ACL element
<cr>
ciscoasa(config)# access-list INSIDE-IN line 1 extended permit tcp 10.0.0.0 255.255.255.0 any eq ?
configure mode commands/options:
<1-65535> Enter port number (1 - 65535)
aol
bgp
chargen
cifs
citrix-ica
cmd
ctiqbe
daytime
discard
domain
echo
exec
finger
ftp
ftp-data
gopher
h323
hostname
http
https
ident
imap4
ciscoasa(config)# access-list INSIDE-IN line 1 extended permit tcp 10.0.0.0 255.255.255.0 any eq http
ciscoasa(config)# access-list OUTSIDE-IN line 2 remark EXPLICIT DENY ALL RULE
ciscoasa(config)# access-list OUTSIDE-IN line 3 extended deny ip any any ?
configure mode commands/options:
inactive Keyword for disabling an ACL element
log Keyword for enabling log option on this ACL element
time-range Keyword for attaching time-range option to this ACL element
<cr>
ciscoasa(config)# access-list OUTSIDE-IN line 3 extended deny ip any any log ?
configure mode commands/options:
<0-7> Enter syslog level (0 - 7)
Default Keyword for restoring default log behavior
alerts Immediate action needed (severity=1)
critical Critical conditions (severity=2)
debugging Debugging messages (severity=7)
disable Disable log option on this ACL element, (no log at all)
emergencies System is unusable (severity=0)
errors Error conditions (severity=3)
inactive Keyword for disabling an ACL element
informational Informational messages (severity=6)
interval Configure log interval, default value is 300 sec
notifications Normal but significant conditions (severity=5)
time-range Keyword for attaching time-range option to this ACL element
warnings Warning conditions (severity=4)
<cr>
ciscoasa(config)# access-list OUTSIDE-IN line 3 extended deny ip any any log 4 ?
configure mode commands/options:
inactive Keyword for disabling an ACL element
interval Configure log interval, default value is 300 sec
time-range Keyword for attaching time-range option to this ACL element
<cr>
ciscoasa(config)# access-list OUTSIDE-IN line 3 extended deny ip any any log 4 interval 300
ciscoasa(config)# object network TIME.NIST.GOV
ciscoasa(config-network-object)# host 192.43.244.18
ciscoasa(config-network-object)# exit
ciscoasa(config)# access-list GLOBAL-ACL line 1 extended permit udp any object TIME.NIST.GOV eq ntp log ?
configure mode commands/options:
<0-7> Enter syslog level (0 - 7)
Default Keyword for restoring default log behavior
alerts Immediate action needed (severity=1)
critical Critical conditions (severity=2)
debugging Debugging messages (severity=7)
disable Disable log option on this ACL element, (no log at all)
emergencies System is unusable (severity=0)
errors Error conditions (severity=3)
inactive Keyword for disabling an ACL element
informational Informational messages (severity=6)
interval Configure log interval, default value is 300 sec
notifications Normal but significant conditions (severity=5)
time-range Keyword for attaching time-range option to this ACL element
warnings Warning conditions (severity=4)
<cr>
ciscoasa(config)# access-list GLOBAL-ACL line 1 extended permit udp any object TIME.NIST.GOV eq ntp log disable
ciscoasa(config)# access-group ?
configure mode commands/options:
WORD Specify the name of an access-list
ciscoasa(config)# access-group INSIDE-IN ?
configure mode commands/options:
global For traffic on all interfaces
in For input traffic
out For output traffic
<cr>
ciscoasa(config)# access-group INSIDE-IN in ?
configure mode commands/options:
interface Keyword to specify an interface
ciscoasa(config)# access-group INSIDE-IN in interface ?
configure mode commands/options:
Current available interface(s):
dmz Name of interface GigabitEthernet1
inside Name of interface GigabitEthernet0
outside Name of interface GigabitEthernet2
ciscoasa(config)# access-group INSIDE-IN in interface inside
ciscoasa(config)# access-group OUTSIDE-IN in interface outside
ciscoasa(config)# access-group GLOBAL-ACL global
The ASDM Access Rules table contains several features that enable you to quickly and efficiently manage it.
From the menu, you can choose to add, insert, edit or delete an access rule. You can also easily copy (clone) a rule, for instance, when you add another web server. Just clone the existing web server rule, and then edit it to change the destination IP address.
You can change the order of rules, using either the cut/copy and paste options or the move up/down arrows. Remember that access rules are evaluated in order and positioning of the rule is critical to its functionality.
You can also clear the hit counter for a specific rule (right-click menu) or all access rules (button on the toolbar), which is commonly required during troubleshooting. You can also show log messages generated by a chosen rule (right-click menu) or by all access rules (button on the toolbar). Additionally from the right-click menu, you can export the contents of the Access Rules table to a comma-separated value (CSV) format file.
You can edit a rule in place (rather than opening the Edit Access Rule dialog box) and alter the contents within the Access Rules window. Rules can also be temporarily disabled and if you want to permanently remove a rule, simply delete it.
You can configure an interface access rules in the CLI by using the access-list command. ACLs are made up of one or more access control entries (ACE), each represented by one line in the ACL, that specifying a permit or deny rule, or remark.
ciscoasa(config)# access-list ?
configure mode commands/options:
WORD < 241 char Access list identifier
alert-interval Specify the alert interval for generating syslog message
106001 which alerts that the system has reached a deny flow
maximum. If not specified, the default value is 300 sec
deny-flow-max Specify the maximum number of concurrent deny flows that can
be created. If not specified, the default value is 4096
ciscoasa(config)# access-list INSIDE-IN ?
configure mode commands/options:
deny Specify packets to reject
extended Configure access policy for IP traffic through the system
line Use this to specify line number at which ACE should be entered
permit Specify packets to forward
remark Specify a comment (remark) for the access-list after this keyword
rename rename an existing access-list
standard Use this to configure policy having destination host or network
only
webtype Use this to configure WebVPN related policy
ciscoasa(config)# access-list INSIDE-IN line 1 ?
configure mode commands/options:
deny Specify packets to reject
extended Configure access policy for IP traffic through the system
permit Specify packets to forward
remark Specify a comment (remark) for the access-list after this keyword
ciscoasa(config)# access-list INSIDE-IN line 1 extended ?
configure mode commands/options:
deny Specify packets to reject
permit Specify packets to forward
ciscoasa(config)# access-list INSIDE-IN line 1 extended permit ?
configure mode commands/options:
<0-255> Enter protocol number (0 - 255)
ah
eigrp
esp
gre
icmp
icmp6
igmp
igrp
ip
ipinip
ipsec
nos
object Specify a service object after this keyword
object-group Specify a service or protocol object-group after this keyword
ospf
pcp
pim
pptp
snp
tcp
udp
ciscoasa(config)# access-list INSIDE-IN line 1 extended permit tcp ?
configure mode commands/options:
A.B.C.D Source IP address
any Abbreviation for source address and mask of 0.0.0.0
0.0.0.0
host Use this keyword to configure source host
interface Use interface address as source address
object Keyword to enter source object name
object-group Network object-group for source address
object-group-user User object-group for source address
user User for source address [<domain_nickname>\]<user_name>
user-group User-group for source address
[<domain_nickname>\\]<user_group_name>
ciscoasa(config)# access-list INSIDE-IN line 1 extended permit tcp 10.0.0.0 ?
configure mode commands/options:
A.B.C.D Netmask for source IP address
ciscoasa(config)# access-list INSIDE-IN line 1 extended permit tcp 10.0.0.0 255.255.255.0 ?
configure mode commands/options:
A.B.C.D Destination IP address
any Abbreviation for destination address and mask of 0.0.0.0
0.0.0.0
eq Port equal to operator
gt Port greater than operator
host Use this keyword to configure destination host
interface Use interface address as destination address
lt Port less than operator
neq Port not equal to operator
object Keyword to enter destination object name
object-group Optional service object-group name for source port or network
object-group for destination address
range Port range operator
ciscoasa(config)# access-list INSIDE-IN line 1 extended permit tcp 10.0.0.0 255.255.255.0 any ?
configure mode commands/options:
eq Port equal to operator
gt Port greater than operator
inactive Keyword for disabling an ACL element
log Keyword for enabling log option on this ACL element
lt Port less than operator
neq Port not equal to operator
object-group Optional service object-group for destination port
range Port range operator
time-range Keyword for attaching time-range option to this ACL element
<cr>
ciscoasa(config)# access-list INSIDE-IN line 1 extended permit tcp 10.0.0.0 255.255.255.0 any eq ?
configure mode commands/options:
<1-65535> Enter port number (1 - 65535)
aol
bgp
chargen
cifs
citrix-ica
cmd
ctiqbe
daytime
discard
domain
echo
exec
finger
ftp
ftp-data
gopher
h323
hostname
http
https
ident
imap4
ciscoasa(config)# access-list INSIDE-IN line 1 extended permit tcp 10.0.0.0 255.255.255.0 any eq http
ciscoasa(config)# access-list OUTSIDE-IN line 2 remark EXPLICIT DENY ALL RULE
ciscoasa(config)# access-list OUTSIDE-IN line 3 extended deny ip any any ?
configure mode commands/options:
inactive Keyword for disabling an ACL element
log Keyword for enabling log option on this ACL element
time-range Keyword for attaching time-range option to this ACL element
<cr>
ciscoasa(config)# access-list OUTSIDE-IN line 3 extended deny ip any any log ?
configure mode commands/options:
<0-7> Enter syslog level (0 - 7)
Default Keyword for restoring default log behavior
alerts Immediate action needed (severity=1)
critical Critical conditions (severity=2)
debugging Debugging messages (severity=7)
disable Disable log option on this ACL element, (no log at all)
emergencies System is unusable (severity=0)
errors Error conditions (severity=3)
inactive Keyword for disabling an ACL element
informational Informational messages (severity=6)
interval Configure log interval, default value is 300 sec
notifications Normal but significant conditions (severity=5)
time-range Keyword for attaching time-range option to this ACL element
warnings Warning conditions (severity=4)
<cr>
ciscoasa(config)# access-list OUTSIDE-IN line 3 extended deny ip any any log 4 ?
configure mode commands/options:
inactive Keyword for disabling an ACL element
interval Configure log interval, default value is 300 sec
time-range Keyword for attaching time-range option to this ACL element
<cr>
ciscoasa(config)# access-list OUTSIDE-IN line 3 extended deny ip any any log 4 interval 300
ciscoasa(config)# object network TIME.NIST.GOV
ciscoasa(config-network-object)# host 192.43.244.18
ciscoasa(config-network-object)# exit
ciscoasa(config)# access-list GLOBAL-ACL line 1 extended permit udp any object TIME.NIST.GOV eq ntp log ?
configure mode commands/options:
<0-7> Enter syslog level (0 - 7)
Default Keyword for restoring default log behavior
alerts Immediate action needed (severity=1)
critical Critical conditions (severity=2)
debugging Debugging messages (severity=7)
disable Disable log option on this ACL element, (no log at all)
emergencies System is unusable (severity=0)
errors Error conditions (severity=3)
inactive Keyword for disabling an ACL element
informational Informational messages (severity=6)
interval Configure log interval, default value is 300 sec
notifications Normal but significant conditions (severity=5)
time-range Keyword for attaching time-range option to this ACL element
warnings Warning conditions (severity=4)
<cr>
ciscoasa(config)# access-list GLOBAL-ACL line 1 extended permit udp any object TIME.NIST.GOV eq ntp log disable
ciscoasa(config)# access-group ?
configure mode commands/options:
WORD Specify the name of an access-list
ciscoasa(config)# access-group INSIDE-IN ?
configure mode commands/options:
global For traffic on all interfaces
in For input traffic
out For output traffic
<cr>
ciscoasa(config)# access-group INSIDE-IN in ?
configure mode commands/options:
interface Keyword to specify an interface
ciscoasa(config)# access-group INSIDE-IN in interface ?
configure mode commands/options:
Current available interface(s):
dmz Name of interface GigabitEthernet1
inside Name of interface GigabitEthernet0
outside Name of interface GigabitEthernet2
ciscoasa(config)# access-group INSIDE-IN in interface inside
ciscoasa(config)# access-group OUTSIDE-IN in interface outside
ciscoasa(config)# access-group GLOBAL-ACL global
The ASDM Access Rules table contains several features that enable you to quickly and efficiently manage it.
From the menu, you can choose to add, insert, edit or delete an access rule. You can also easily copy (clone) a rule, for instance, when you add another web server. Just clone the existing web server rule, and then edit it to change the destination IP address.
You can change the order of rules, using either the cut/copy and paste options or the move up/down arrows. Remember that access rules are evaluated in order and positioning of the rule is critical to its functionality.
You can also clear the hit counter for a specific rule (right-click menu) or all access rules (button on the toolbar), which is commonly required during troubleshooting. You can also show log messages generated by a chosen rule (right-click menu) or by all access rules (button on the toolbar). Additionally from the right-click menu, you can export the contents of the Access Rules table to a comma-separated value (CSV) format file.
You can edit a rule in place (rather than opening the Edit Access Rule dialog box) and alter the contents within the Access Rules window. Rules can also be temporarily disabled and if you want to permanently remove a rule, simply delete it.
Saturday, October 5, 2013
New NAT Options in IOS Versions 8.3 and Later
* One significant change in NAT with software versions 8.3 and higher is that NAT control (enforcing use of NAT) is no longer a supported.
* The implementation of NAT is done through the use of network objects (hence, "object-oriented")
* There is now an "any" option that can be used when defining ingress and egress interfaces in the NAT configuration.
* You can configure translations as part of network object definitions, which are added to configuration. This is known as "Auto NAT," which reduces complex configuration when only one translation policy is required for a host.
* You can configure a single NAT rule that will translate both the source and destination addresses in a packet. This is known as "Manual NAT" or "Twice NAT," because NAT can be performed twice - once on the source IP and the other on the destination IP.
* NAT rules can be defined as unidirectional, meaning only traffic sourced from a defined object can use the translation. Connections toward the object must match a different NAT rule, or they will not be translated.
In this scenario, we have two application servers on the DMZ interface that require access from the Internet. A web server with native (local) IP address 172.16.0.5 and an FTP server with native IP address 172.16.0.10. The web server will use translated (global) IP address 209.165.200.228 when communicating with the outside interface (the Internet), and the FTP server will use translated IP address 209.165.200.229.
ciscoasa(config)# object ?
configure mode commands/options:
network Specifies a host, subnet or range IP addresses
service Specifies a protocol/port
ciscoasa(config)# object network ?
configure mode commands/options:
WORD < 65 char Specifies object ID (1-64 characters)
ciscoasa(config)# object network DMZ-FTP-PUB
ciscoasa(config-network-object)# ?
description Specify description text
fqdn Enter this keyword to specify an FQDN
help Help for network object configuration commands
host Enter this keyword to specify a single host object
nat Enable NAT on a singleton object
no Remove an object or description from object
range Enter this keyword to specify a range
subnet Enter this keyword to specify a subnet
ciscoasa(config-network-object)# host ?
network-object mode commands/options:
A.B.C.D Enter a host IP address
X:X:X:X::X Enter a host IPV6 address
ciscoasa(config-network-object)# host 209.165.200.229
ciscoasa(config-network-object)# exit
ciscoasa(config)# object network DMZ-FTP-PRIV
ciscoasa(config-network-object)# host 172.16.0.10
ciscoasa(config-network-object)# nat ?
network-object mode commands/options:
( Open parenthesis for (<real_if_name>,<mapped_if_name>) pair where
<real_if_name> is the prenat interface and <mapped_if_name> is the
postnat interface
dynamic Specify NAT type as dynamic
static Specify NAT type as static
configure mode commands/options:
( Open parenthesis for (<internal_if_name>,<external_if_name>)
pair where <internal_if_name> is the Internal or prenat
interface and <external_if_name> is the External or postnat
interface
<1-2147483647> Position of NAT rule within before auto section
after-auto Insert NAT rule after auto section
source Source NAT parameters
ciscoasa(config-network-object)# nat (?
network-object mode commands/options:
Current available interface(s):
DMZ Name of interface GigabitEthernet1
any Global address space
inside Name of interface GigabitEthernet0
outside Name of interface GigabitEthernet2
configure mode commands/options:
Current available interface(s):
DMZ Name of interface GigabitEthernet1
any Global address space
inside Name of interface GigabitEthernet0
outside Name of interface GigabitEthernet2
ciscoasa(config-network-object)# nat (DMZ,outside) ?
network-object mode commands/options:
dynamic Specify NAT type as dynamic
static Specify NAT type as static
configure mode commands/options:
<1-2147483647> Position of NAT rule within before auto section
after-auto Insert NAT rule after auto section
source Source NAT parameters
ciscoasa(config-network-object)# nat (DMZ,outside) static ?
network-object mode commands/options:
A.B.C.D Mapped IP address
WORD Mapped network object/object-group name
interface Use interface address as mapped IP
ciscoasa(config-network-object)# nat (DMZ,outside) static DMZ-FTP-PUB
ciscoasa(config-network-object)# exit
ciscoasa(config)# object network DMZ-WEB-PUB
ciscoasa(config-network-object)# host 209.165.200.228
ciscoasa(config-network-object)# exit
ciscoasa(config)# object network DMZ-WEB-PRIV
ciscoasa(config-network-object)# host 172.16.0.5
ciscoasa(config-network-object)# nat (DMZ,outside) static DMZ-WEB-PUB
* The implementation of NAT is done through the use of network objects (hence, "object-oriented")
* There is now an "any" option that can be used when defining ingress and egress interfaces in the NAT configuration.
* You can configure translations as part of network object definitions, which are added to configuration. This is known as "Auto NAT," which reduces complex configuration when only one translation policy is required for a host.
* You can configure a single NAT rule that will translate both the source and destination addresses in a packet. This is known as "Manual NAT" or "Twice NAT," because NAT can be performed twice - once on the source IP and the other on the destination IP.
* NAT rules can be defined as unidirectional, meaning only traffic sourced from a defined object can use the translation. Connections toward the object must match a different NAT rule, or they will not be translated.
In this scenario, we have two application servers on the DMZ interface that require access from the Internet. A web server with native (local) IP address 172.16.0.5 and an FTP server with native IP address 172.16.0.10. The web server will use translated (global) IP address 209.165.200.228 when communicating with the outside interface (the Internet), and the FTP server will use translated IP address 209.165.200.229.
ciscoasa(config)# object ?
configure mode commands/options:
network Specifies a host, subnet or range IP addresses
service Specifies a protocol/port
ciscoasa(config)# object network ?
configure mode commands/options:
WORD < 65 char Specifies object ID (1-64 characters)
ciscoasa(config)# object network DMZ-FTP-PUB
ciscoasa(config-network-object)# ?
description Specify description text
fqdn Enter this keyword to specify an FQDN
help Help for network object configuration commands
host Enter this keyword to specify a single host object
nat Enable NAT on a singleton object
no Remove an object or description from object
range Enter this keyword to specify a range
subnet Enter this keyword to specify a subnet
ciscoasa(config-network-object)# host ?
network-object mode commands/options:
A.B.C.D Enter a host IP address
X:X:X:X::X Enter a host IPV6 address
ciscoasa(config-network-object)# host 209.165.200.229
ciscoasa(config-network-object)# exit
ciscoasa(config)# object network DMZ-FTP-PRIV
ciscoasa(config-network-object)# host 172.16.0.10
ciscoasa(config-network-object)# nat ?
network-object mode commands/options:
( Open parenthesis for (<real_if_name>,<mapped_if_name>) pair where
<real_if_name> is the prenat interface and <mapped_if_name> is the
postnat interface
dynamic Specify NAT type as dynamic
static Specify NAT type as static
configure mode commands/options:
( Open parenthesis for (<internal_if_name>,<external_if_name>)
pair where <internal_if_name> is the Internal or prenat
interface and <external_if_name> is the External or postnat
interface
<1-2147483647> Position of NAT rule within before auto section
after-auto Insert NAT rule after auto section
source Source NAT parameters
ciscoasa(config-network-object)# nat (?
network-object mode commands/options:
Current available interface(s):
DMZ Name of interface GigabitEthernet1
any Global address space
inside Name of interface GigabitEthernet0
outside Name of interface GigabitEthernet2
configure mode commands/options:
Current available interface(s):
DMZ Name of interface GigabitEthernet1
any Global address space
inside Name of interface GigabitEthernet0
outside Name of interface GigabitEthernet2
ciscoasa(config-network-object)# nat (DMZ,outside) ?
network-object mode commands/options:
dynamic Specify NAT type as dynamic
static Specify NAT type as static
configure mode commands/options:
<1-2147483647> Position of NAT rule within before auto section
after-auto Insert NAT rule after auto section
source Source NAT parameters
ciscoasa(config-network-object)# nat (DMZ,outside) static ?
network-object mode commands/options:
A.B.C.D Mapped IP address
WORD Mapped network object/object-group name
interface Use interface address as mapped IP
ciscoasa(config-network-object)# nat (DMZ,outside) static DMZ-FTP-PUB
ciscoasa(config-network-object)# exit
ciscoasa(config)# object network DMZ-WEB-PUB
ciscoasa(config-network-object)# host 209.165.200.228
ciscoasa(config-network-object)# exit
ciscoasa(config)# object network DMZ-WEB-PRIV
ciscoasa(config-network-object)# host 172.16.0.5
ciscoasa(config-network-object)# nat (DMZ,outside) static DMZ-WEB-PUB
Saturday, September 28, 2013
Configuring Dynamic Inside PAT on an ASA (pre-8.3)
There are four pieces of information necessary for an ASA to perform NAT:
* Original source IP address (and port) in the packet
* Interface where the original packet enters the ASA (ingress interface)
* Interface where the packet will exit the ASA (egress interface)
* Translated address (and, optionally, port) to insert into the packet
Dynamic inside PAT creates many-to-one translations, allowing several local (original) IP addresses to share a single global (translated) IP address. It does so by creating a temporary translation of both the original IP address and the original source port number to a global IP address and unique global port number, for each translated session. These translations are created and added to the translation table for each outbound TCP or UDP session requiring PAT. These are removed from the NAT table when the OSI Layer 4 session closes.
You can define an available IP address, or you can use of the ASA's IP address on the egress interface. Using the ASA interface IP is particularly usefeul in environments where you are provided with only one IP address (usually dynamic) by an ISP.
Dynamic PAT is typically used for client hosts that need outbound connectivity only, and when there are not enough global IP addresses available to assign a unique global address to each local host.
ASA802(config)# nat ?
configure mode commands/options:
( Open parenthesis for the name of the network interface where the
hosts/network designated by the local IP address are accessed
ASA802(config)# nat (?
configure mode commands/options:
Current available interface(s):
inside Name of interface Ethernet0/1
outside Name of interface Ethernet0/0
ASA802(config)# nat (inside) ?
configure mode commands/options:
<0-2147483647> The <nat_id> of this group of hosts/networks. This <nat_id>
will be referenced by the global command to associate a
global pool with the local IP address. <nat_id> '0' is used
to indicate no address translation for local IP. The limit is
65535 with access-lists
ASA802(config)# nat (inside) 1 ?
configure mode commands/options:
Hostname or A.B.C.D The hosts/networks in this <nat_id> group, '0' indicates
all networks or the default <nat_id> group
access-list Specify access-list name after this keyword
ASA802(config)# nat (inside) 1 10.1.1.0 ?
configure mode commands/options:
A.B.C.D IP netmask to apply to the local IP address
<cr>
ASA802(config)# nat (inside) 1 10.1.1.0 255.255.255.0 ?
configure mode commands/options:
<0-65535> The maximum number of simultaneous TCP connections the local IP
hosts are to allow, default is 0 which means unlimited
connections. Idle connections are closed after the time
specified by the timeout conn command
dns Rewrite DNS address record
norandomseq Disable TCP sequence number randomization
outside Enable Outside NAT
tcp Configure TCP specific parameters
udp Configure UDP specific parameters
<cr>
ASA802(config)# nat (inside) 1 10.1.1.0 255.255.255.0 tcp ?
configure mode commands/options:
<0-65535> The maximum number of simultaneous TCP connections the local IP
hosts are to allow, default is 0 which means unlimited
connections. Idle connections are closed after the time specified
by the timeout conn command
ASA802(config)# nat (inside) 1 10.1.1.0 255.255.255.0 tcp 0 ?
configure mode commands/options:
<0-65535> The maximum number of embryonic connections per host, default is
0, which means unlimited connections. An embryonic connection is a
connection request that has not finished the necessary handshake
between source and destination
<cr>
ASA802(config)# nat (inside) 1 10.1.1.0 255.255.255.0 tcp 0 0 ?
configure mode commands/options:
norandomseq Disable TCP sequence number randomization
udp Configure UDP specific parameters
<cr>
ASA802(config)# nat (inside) 1 10.1.1.0 255.255.255.0 tcp 0 0 udp ?
configure mode commands/options:
<0-65535> The maximum number of simultaneous UDP connections the local IP
hosts are to allow, default is 0 which means unlimited
connections. Idle connections are closed after the time specified
by the timeout conn command
ASA802(config)# nat (inside) 1 10.1.1.0 255.255.255.0 tcp 0 0 udp 0
ASA802(config)# global ?
configure mode commands/options:
( Open parenthesis for the external network interface name
ASA802(config)# global (?
configure mode commands/options:
Current available interface(s):
inside Name of interface Ethernet0/1
outside Name of interface Ethernet0/0
ASA802(config)# global (outside) ?
configure mode commands/options:
<0-2147483647> The id of the NAT group that will draw from these global
addresses
ASA802(config)# global (outside) 1 ?
configure mode commands/options:
WORD Enter IP address or a range of IP addresses <start_ip>[-<end_ip>]
interface Specifies PAT using the IP address at the interface
ASA802(config)# global (outside) 1 interface
ASA802# show xlate
0 in use, 1 most used
My PC is still not able to ping the Internet (8.8.8.8) and there's no output on the NAT Table (0 in use). So I've manually created a policy (Modular Policy Framework or MPF) to allow ICMP or ping and applied it under the ASA's inside interface. I've also enabled the nat-control (disabled by default) to enforce packets from the inside interface to the outside interface to match a NAT rule.
policy-map inside-policy
class inside-class
inspect icmp
!
service-policy inside-policy interface inside
ASA802(config)# nat?
configure mode commands/options:
nat nat-control
ASA802(config)# nat-control
ASA802# show xlate
2 in use, 2 most used
PAT Global 200.1.1.1(1024) Local 10.1.1.10(2985)
PAT Global 200.1.1.1(14) Local 10.1.1.10 ICMP id 1
ASA802# show xlate detail
2 in use, 2 most used
Flags: D - DNS, d - dump, I - identity, i - dynamic, n - no random,
r - portmap, s - static
ICMP PAT from inside:10.1.1.10/1 to outside:200.1.1.1/15 flags ri
TCP PAT from inside:10.1.1.10/2985 to outside:200.1.1.1/1024 flags ri
* Original source IP address (and port) in the packet
* Interface where the original packet enters the ASA (ingress interface)
* Interface where the packet will exit the ASA (egress interface)
* Translated address (and, optionally, port) to insert into the packet
Dynamic inside PAT creates many-to-one translations, allowing several local (original) IP addresses to share a single global (translated) IP address. It does so by creating a temporary translation of both the original IP address and the original source port number to a global IP address and unique global port number, for each translated session. These translations are created and added to the translation table for each outbound TCP or UDP session requiring PAT. These are removed from the NAT table when the OSI Layer 4 session closes.
You can define an available IP address, or you can use of the ASA's IP address on the egress interface. Using the ASA interface IP is particularly usefeul in environments where you are provided with only one IP address (usually dynamic) by an ISP.
Dynamic PAT is typically used for client hosts that need outbound connectivity only, and when there are not enough global IP addresses available to assign a unique global address to each local host.
ASA802(config)# nat ?
configure mode commands/options:
( Open parenthesis for the name of the network interface where the
hosts/network designated by the local IP address are accessed
ASA802(config)# nat (?
configure mode commands/options:
Current available interface(s):
inside Name of interface Ethernet0/1
outside Name of interface Ethernet0/0
ASA802(config)# nat (inside) ?
configure mode commands/options:
<0-2147483647> The <nat_id> of this group of hosts/networks. This <nat_id>
will be referenced by the global command to associate a
global pool with the local IP address. <nat_id> '0' is used
to indicate no address translation for local IP. The limit is
65535 with access-lists
ASA802(config)# nat (inside) 1 ?
configure mode commands/options:
Hostname or A.B.C.D The hosts/networks in this <nat_id> group, '0' indicates
all networks or the default <nat_id> group
access-list Specify access-list name after this keyword
ASA802(config)# nat (inside) 1 10.1.1.0 ?
configure mode commands/options:
A.B.C.D IP netmask to apply to the local IP address
<cr>
ASA802(config)# nat (inside) 1 10.1.1.0 255.255.255.0 ?
configure mode commands/options:
<0-65535> The maximum number of simultaneous TCP connections the local IP
hosts are to allow, default is 0 which means unlimited
connections. Idle connections are closed after the time
specified by the timeout conn command
dns Rewrite DNS address record
norandomseq Disable TCP sequence number randomization
outside Enable Outside NAT
tcp Configure TCP specific parameters
udp Configure UDP specific parameters
<cr>
ASA802(config)# nat (inside) 1 10.1.1.0 255.255.255.0 tcp ?
configure mode commands/options:
<0-65535> The maximum number of simultaneous TCP connections the local IP
hosts are to allow, default is 0 which means unlimited
connections. Idle connections are closed after the time specified
by the timeout conn command
ASA802(config)# nat (inside) 1 10.1.1.0 255.255.255.0 tcp 0 ?
configure mode commands/options:
<0-65535> The maximum number of embryonic connections per host, default is
0, which means unlimited connections. An embryonic connection is a
connection request that has not finished the necessary handshake
between source and destination
<cr>
ASA802(config)# nat (inside) 1 10.1.1.0 255.255.255.0 tcp 0 0 ?
configure mode commands/options:
norandomseq Disable TCP sequence number randomization
udp Configure UDP specific parameters
<cr>
ASA802(config)# nat (inside) 1 10.1.1.0 255.255.255.0 tcp 0 0 udp ?
configure mode commands/options:
<0-65535> The maximum number of simultaneous UDP connections the local IP
hosts are to allow, default is 0 which means unlimited
connections. Idle connections are closed after the time specified
by the timeout conn command
ASA802(config)# nat (inside) 1 10.1.1.0 255.255.255.0 tcp 0 0 udp 0
ASA802(config)# global ?
configure mode commands/options:
( Open parenthesis for the external network interface name
ASA802(config)# global (?
configure mode commands/options:
Current available interface(s):
inside Name of interface Ethernet0/1
outside Name of interface Ethernet0/0
ASA802(config)# global (outside) ?
configure mode commands/options:
<0-2147483647> The id of the NAT group that will draw from these global
addresses
ASA802(config)# global (outside) 1 ?
configure mode commands/options:
WORD Enter IP address or a range of IP addresses <start_ip>[-<end_ip>]
interface Specifies PAT using the IP address at the interface
ASA802(config)# global (outside) 1 interface
ASA802# show xlate
0 in use, 1 most used
My PC is still not able to ping the Internet (8.8.8.8) and there's no output on the NAT Table (0 in use). So I've manually created a policy (Modular Policy Framework or MPF) to allow ICMP or ping and applied it under the ASA's inside interface. I've also enabled the nat-control (disabled by default) to enforce packets from the inside interface to the outside interface to match a NAT rule.
policy-map inside-policy
class inside-class
inspect icmp
!
service-policy inside-policy interface inside
ASA802(config)# nat?
configure mode commands/options:
nat nat-control
ASA802(config)# nat-control
ASA802# show xlate
2 in use, 2 most used
PAT Global 200.1.1.1(1024) Local 10.1.1.10(2985)
PAT Global 200.1.1.1(14) Local 10.1.1.10 ICMP id 1
ASA802# show xlate detail
2 in use, 2 most used
Flags: D - DNS, d - dump, I - identity, i - dynamic, n - no random,
r - portmap, s - static
ICMP PAT from inside:10.1.1.10/1 to outside:200.1.1.1/15 flags ri
TCP PAT from inside:10.1.1.10/2985 to outside:200.1.1.1/1024 flags ri
Subscribe to:
Posts (Atom)