Sunday, October 1, 2023

Upgrade FortiGate HA Cluster Firmware

Here's a Fortinet link in performing a FortiGate High Availability (HA) cluster firmware upgrade. The process is very similar to a standalone FortiGate upgrade. You only upload or transfer the firmware to the Primary FortiGate device.

You can upgrade firmware on all nodes in a cluster from the primary node.

The following process occurs when you perform the HA upgrade procedure:


  1. The primary node pushes the firmware image to the member nodes.
  2. The primary node notifies the member nodes of the upgrade, and it takes their user traffic during the upgrade.
  3. The upgrade command is run on the member nodes, the systems are rebooted, and the member nodes send the primary node an acknowledgment that upgrade has been completed.
  4. The upgrade command is run on the primary node, and it reboots. When the system is rebooting, a member node assumes primary status, and the traffic fails over from the former primary node to the new primary node.


After the upgrade process is completed, the system determines whether the original node becomes the primary node, according to the HA Override setting:


  • If Override is enabled, the cluster considers the Device Priority setting. Both nodes usually make a second failover in order to resume their original roles.
  • If Override is disabled, the cluster considers uptime first. The original primary node will have a smaller uptime due to the order of reboots during the firmware upgrade. Therefore it will not resume its active role; instead, the node with the greatest uptime will remain the new primary node. A second failover will not occur.


Reboot times vary by the appliance model, and also by differences between the original firmware version and the firmware version you are installing.


There's also a debate in the Fortinet support forum and some in Reddit whether you can directly upgrade a new FortiGate to the target FortiOS. Some Fortinet folks strictly encourage to follow the upgrade path even in a new device in order to avoid corruption and other unforeseen issues, i.e. "brick" the device.


Here's the result taken from ChatGPT which is slightly different from the Fortinet doc, i.e. upload firmware on both Primary and Secondary ForitGate units.


Upgrading the firmware on a FortiGate High Availability (HA) cluster involves several steps to ensure a smooth and seamless transition. Here's a general guide on how to upgrade the firmware on a FortiGate HA cluster:

Important Note: Before proceeding with the firmware upgrade, make sure to read the release notes for the new firmware version to understand any potential compatibility issues or new features.

    Backup Configuration:
        Log in to the primary FortiGate unit and backup the current configuration. Go to System > Dashboard > Status > Backup and create a backup of the configuration.

    Download Firmware:
        Download the firmware image for the desired version from the Fortinet Support Portal (https://support.fortinet.com/).

    Upload Firmware to Both Units:
        Log in to both the primary and secondary FortiGate units.
        Navigate to System > Firmware and upload the firmware image to both units.


    Verify Compatibility:
        Confirm that the firmware version you're upgrading to is compatible with your hardware and any other devices in your network, including switches, routers, and third-party devices.

    Upgrade the Secondary Unit:
        Initiate the firmware upgrade on the secondary unit first. This helps ensure that you always have one active unit during the upgrade process.
            Go to System > Dashboard > Status > System Information and click on the "Update" link next to the secondary unit's firmware version.
            Follow the on-screen instructions to upload and install the new firmware on the secondary unit.

    Failover to the Secondary Unit:
        After upgrading the secondary unit, perform a failover to make it the active unit. This can be done manually or automatically depending on your HA configuration.
            To manually failover, go to System > Dashboard > Status > HA and click on the "Failover" button.
            To configure automatic failover, go to System > HA > Advanced > Configurations and set the appropriate options.

    Test the Secondary Unit:
        Verify that the secondary unit is functioning correctly as the active unit. Check for any issues or configuration discrepancies.

    Upgrade the Primary Unit:
        Once the secondary unit is confirmed to be working as expected, initiate the firmware upgrade on the primary unit.
            Go to System > Dashboard > Status > System Information and click on the "Update" link next to the primary unit's firmware version.
            Follow the on-screen instructions to upload and install the new firmware on the primary unit.

    Failover Back to the Primary Unit:
        After upgrading the primary unit, perform a failover back to the primary unit if it's not set to automatically fail back.

    Test and Monitor:
        After the upgrade is complete and both units are operating normally, thoroughly test your network to ensure that all services and configurations are functioning as expected.

    Clean Up:
        Once you're confident that the upgrade was successful, you can delete any backup configuration files and older firmware versions to free up storage space.

Always refer to the official Fortinet documentation and release notes for your specific FortiGate model and firmware version for detailed and up-to-date instructions. Additionally, consider performing these upgrades during a maintenance window to minimize disruption to your network services.


You can check the current firmware in FortiGate GUI by going to Global VDOM: Status > System Infromation > Firmware: v7.2.4 build1396.

This is the Primary FortiGate current firmware.

This is the Secondary FortiGate current firmware.

You can also use the get system status command to verify the current firmware Version.


FW01_PRI # get system status

Version: FortiGate-40F v7.2.4,build1396,230131 (GA.F)

Firmware Signature: certified

Virus-DB: 1.00000(2018-04-09 18:07)

Extended DB: 1.00000(2018-04-09 18:07)

AV AI/ML Model: 0.00000(2001-01-01 00:00)

IPS-DB: 6.00741(2015-12-01 02:30)

IPS-ETDB: 0.00000(2001-01-01 00:00)

APP-DB: 6.00741(2015-12-01 02:30)

INDUSTRIAL-DB: 6.00741(2015-12-01 02:30)

IPS Malicious URL Database: 1.00001(2015-01-01 01:01)

IoT-Detect: 0.00000(2022-08-17 17:31)

Serial-Number: FGT40FTKxxxxP0S

BIOS version: 05000021

System Part-Number: P24680-04

Log hard disk: Not available

Hostname: FW01_PRI

Private Encryption: Disable

Operation Mode: NAT

Current virtual domain: internet

Max number of virtual domains: 10

Virtual domains status: 2 in NAT mode, 0 in TP mode

Virtual domain configuration: multiple

FIPS-CC mode: disable

Current HA mode: a-p, primary

Cluster uptime: 114 days, 21 hours, 45 minutes, 42 seconds

Cluster state change time: 2023-03-22 13:32:22

Branch point: 1396

Release Version Information: GA

System time: Tue Jul 11 16:37:30 2023

Last reboot reason: warm reboot


Check the FortiOS upgrade path and release notes in the Fortinet support link.


Select Product: FortiGate > click Upgrade Path > select Current Product: FortiGate-40F > select Current FortiOS Version: 7.2.4 > select Upgrade To FortiOS Version: 7.2.5 > click GO.


The Recommended Upgrade Path is displayed.


Go to Download tab > click v7.00 folder/directory.

Locate the firmware folder sub-directory and find the file for the FortiGate product/platform.


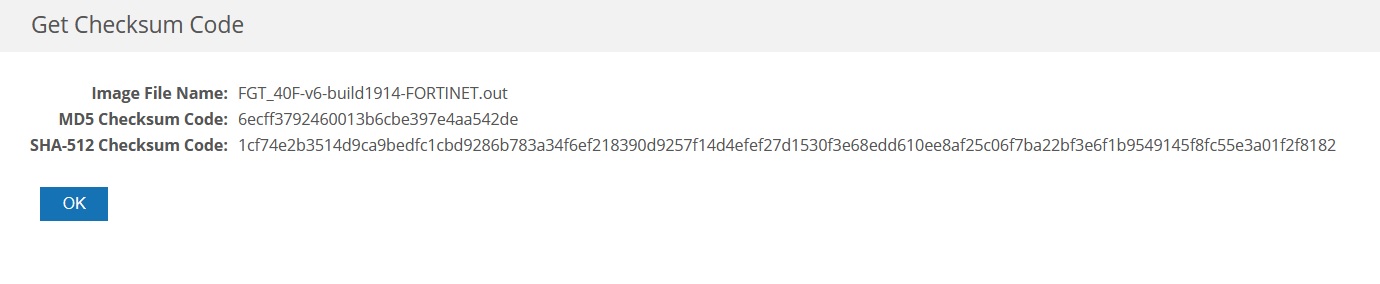
Click Checksum to view the MD5 and SHA-512 Checksum code. Click HTTPS (hyperlink) to download the firmware file.

Before performing the firmware upgrade, check if the High Availability (HA) pair are synchronized under Global VDOM > System > HA.

The upgrade is only performed in the Primary FortiGate. The Primary will send a copy of the firmware to the Secondary (Passive) FortiGate, the Secondary will be the first to be upgraded and then it will auto reboot to reflect the new firmware version.


The Primary will be the next to be upgraded and then automatically reboot.


To perform the HA Active-Passive firmware upgrade, select VDOM: Global > System > Fabric Management > select the Device > Upgrade.
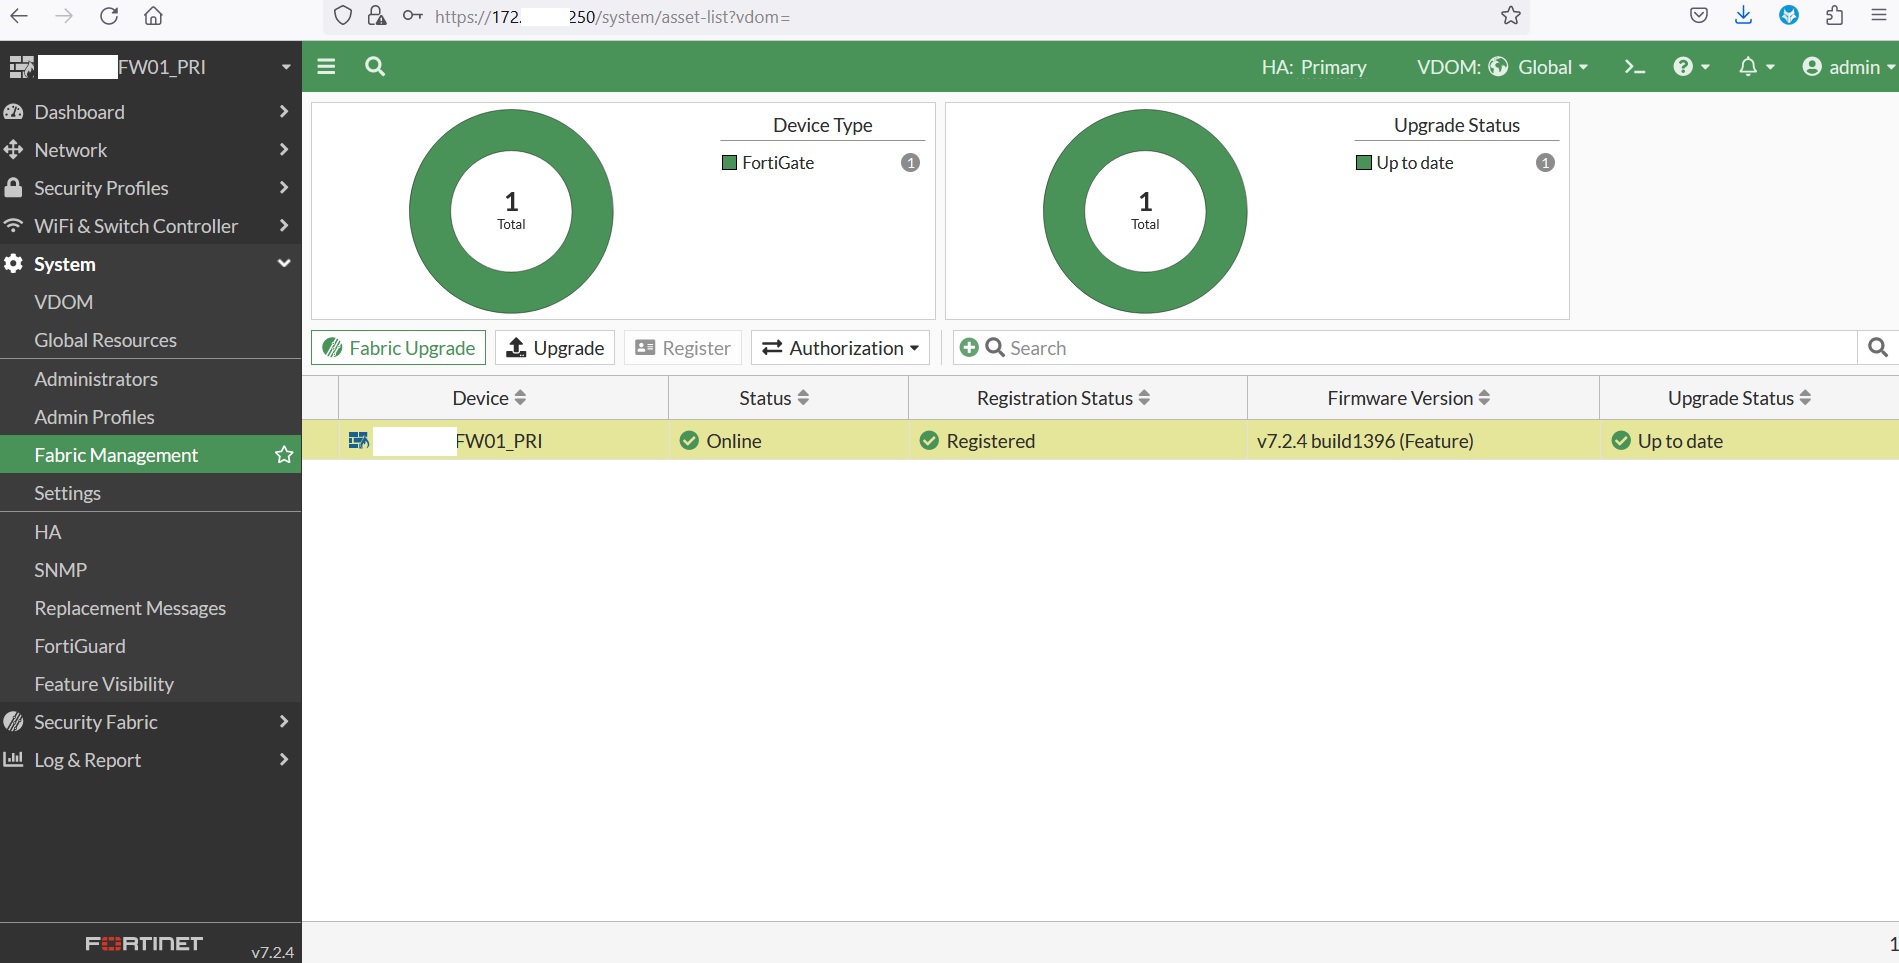
 

Go to File Upload > click Browse > locate the firmware file.

Click Confirm and Backup Config.

Click Continue.


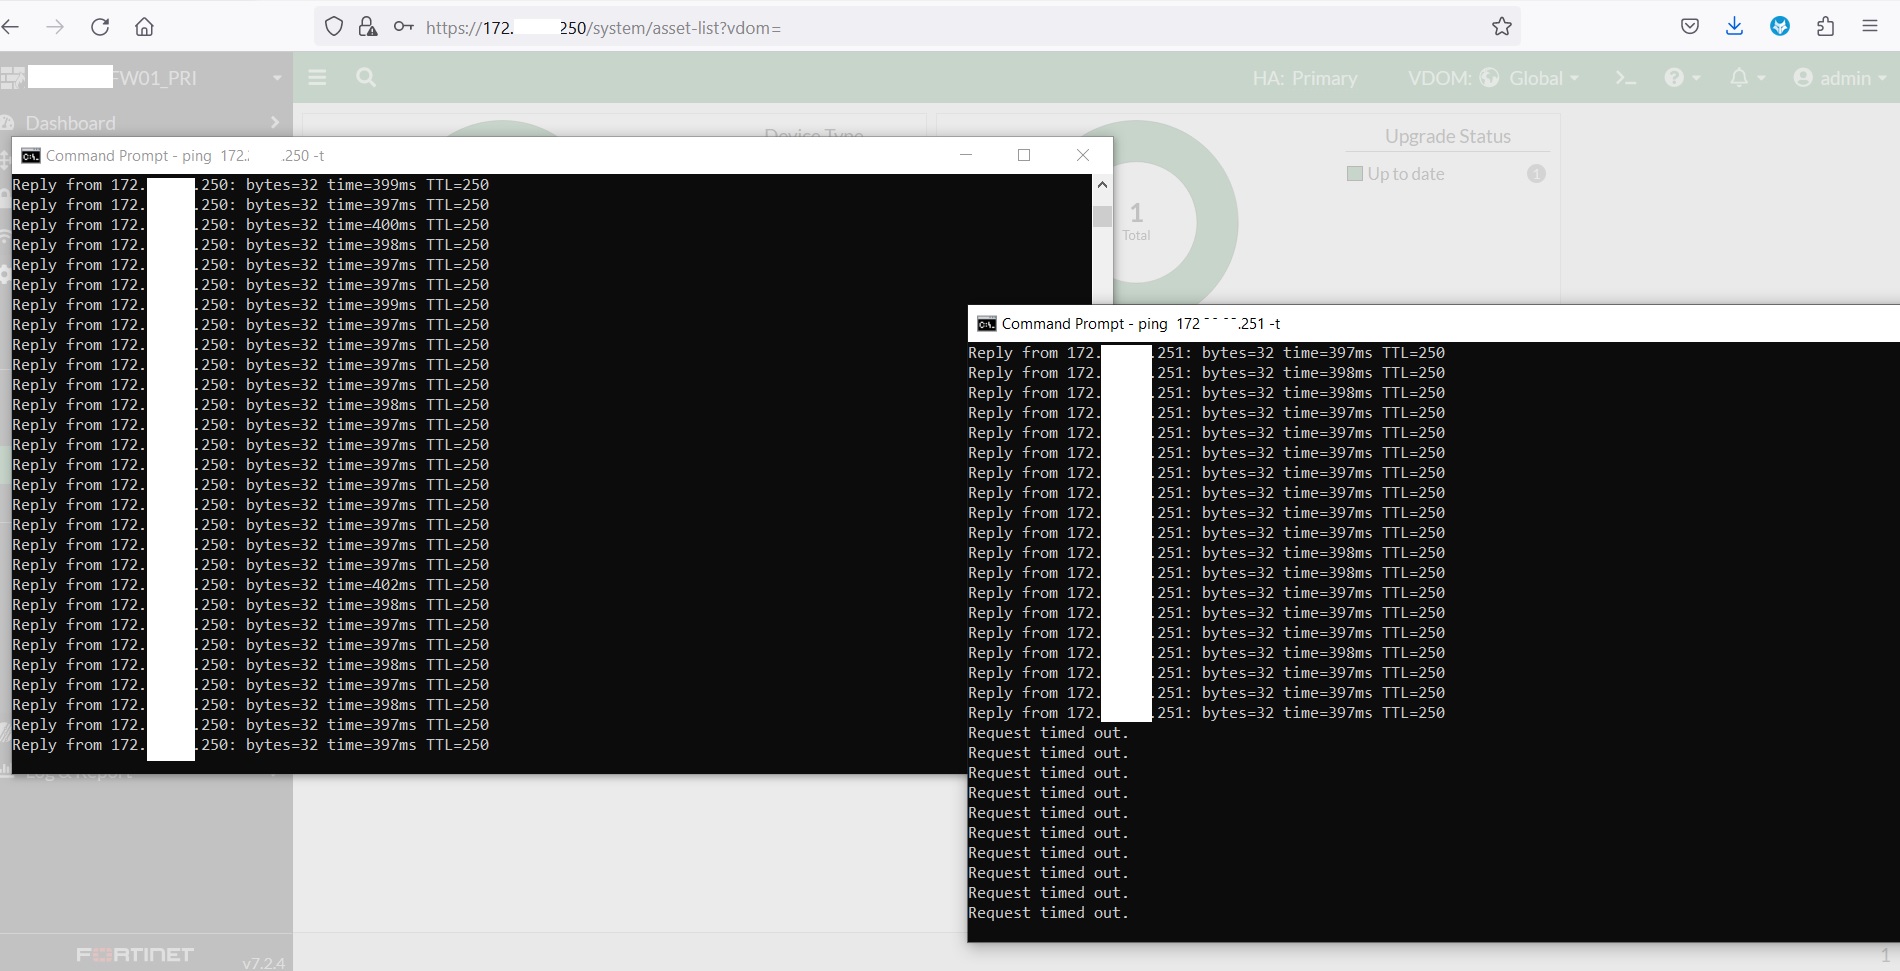
The Secondary FortiGate (left ping window) went offline due to the upgrade process.


Primary FortiGate (right ping window) will remain online/active.


The Secondary FortiGate became HA: Primary and Firmware was updated: v7.2.5 build 1517.

The Primary FortiGate automatically went offline due to the upgrade while Secondary FortiGate remained online (Primary/Active).

The Primary FortiGate went back online again.

The Primary FortiGate became the Primary/Active again and firmware was updated: 7.2.5 build 1517.

The HA Active-Passive firmware upgrade procedure finished around 10 minutes.


HA re-synchronized and the Primary FortiGate became Primary again since it has a higher Priority: 200.


Saturday, September 2, 2023

Troubleshoot Cisco Firepower ASA 2100 PSU via FXOS

I had to troubleshoot a power issue and failover in a High Availability (HA) pair of Cisco FPR 2120 in ASA Appliance mode.

ciscoasa/sec/act# show failover state

               State          Last Failure Reason      Date/Time
This host  -   Secondary
               Active         None
Other host -   Primary
               Standby Ready  Comm Failure             03:33:34 UTC Jun 26 2023


====Configuration State===
        Sync Done
        Sync Done - STANDBY
====Communication State===
        Mac set


The ASA show environment had limited info or output.

ciscoasa/sec/act# show inventory
Name: "Chassis", DESCR: "Firepower 2120 Appliance, 1RU, 12 GE, 4 xSFP, 1 MGMT"
PID: FPR-2120          , VID: V04     , SN: TSP2621ABCD

Name: "Storage Unit 1", DESCR: "Micron_5300_MTFDDAK100TDT"
PID: FPR2K-SSD100, VID: N/A, SN: MSA25071234

Name: "power supply 1", DESCR: ""
PID: N/A, VID: N/A, SN: N/A

Name: "fan 1", DESCR: ""
PID: N/A, VID: N/A, SN: N/A

Name: "fan 2", DESCR: ""
PID: N/A, VID: N/A, SN: N/A

Name: "fan 3", DESCR: ""
PID: N/A, VID: N/A, SN: N/A

Name: "fan 4", DESCR: ""
PID: N/A, VID: N/A, SN: N/A


ciscoasa/sec/act# show environment

Cooling Fans:
-----------------------------------

   Chassis Fans:
   --------------------------------
   Fan 1: 6780 RPM - OK
   Fan 2: 5160 RPM - OK

   Power Supplies:
   --------------------------------

Power Supplies:
-----------------------------------

   Temperature:
   --------------------------------

   Cooling Fans:
   --------------------------------

Temperature:
-----------------------------------

   Processors:
   --------------------------------
   Processor 1: 58.0 C - OK  (Switching Board CPU Temperature)
   Processor 2: 33.0 C - OK  (Blade CPU Temperature)

   Chassis:
   --------------------------------
   Ambient 1: 22.0 C - OK  (Inlet Temperature)
   Ambient 2: 35.0 C - OK  (Internal Temperature)
   Ambient 3: 29.0 C - OK  (Outlet 1 Temperature)
   Ambient 4: 28.0 C - OK  (Outlet 2 Temperature)

   Power Supplies:
   --------------------------------

Voltage:
-----------------------------------

Power Consumption:
-----------------------------------


ciscoasa/sec/act# failover exec mate show environment   // PRIMARY ASA

Cooling Fans:
-----------------------------------

   Chassis Fans:
   --------------------------------
   Fan 1: 5160 RPM - OK
   Fan 2: 5220 RPM - OK

   Power Supplies:
   --------------------------------

Power Supplies:
-----------------------------------

   Temperature:
   --------------------------------

   Cooling Fans:
   --------------------------------

Temperature:
-----------------------------------

   Processors:
   --------------------------------
   Processor 1: 64.0 C - OK  (Switching Board CPU Temperature)
   Processor 2: 41.0 C - OK  (Blade CPU Temperature)

   Chassis:
   --------------------------------
   Ambient 1: 26.0 C - OK  (Inlet Temperature)
   Ambient 2: 41.0 C - OK  (Internal Temperature)
   Ambient 3: 35.0 C - OK  (Outlet 1 Temperature)
   Ambient 4: 35.0 C - OK  (Outlet 2 Temperature)

   Power Supplies:
   --------------------------------

Voltage:
-----------------------------------

Power Consumption:
-----------------------------------


The FXOS CLI command show chassis environment had more useful info. You can only issue the connect fxos in admin context.

ciscoasa/sec/act/admin# changeto system
ciscoasa/sec/act# connect ?
<BLANK>

ciscoasa/sec/act# show fxos mode
Mode is currently set to appliance

ciscoasa/sec/act/admin# connect ?

  fxos  Connect to FXOS Service Manager.
ciscoasa/sec/act/admin# connect fxos
Configuring session.
.
Connecting to FXOS.
...
Connected to FXOS. Escape character sequence is 'CTRL-^X'.

NOTICE: You have connected to the FXOS CLI with read-only privileges.
For admin level privileges connect using 'connect fxos admin'.
Config commands and commit-buffer are not supported in appliance mode.


<OUTPUT TRUNCATED>

You can use the variants of show chassis command to troubleshoot the appliance.


firepower-2120# show    
  chassis              Chassis
  cli                  CLI Information
  clock                Clock
  configuration        Configuration
  eth-uplink           Ethernet Uplink
  event                Event Management
  fabric-interconnect  Show NGFW
  fault                Fault
  fxos-mode            Fxos-mode
  identity             Identity
  ntp-overall-status   NTP Overall Time-Sync Status
  registry-repository  Registry Repository
  security             security mode
  server               Server
  system               Systems
  timezone             Set timezone
  version              System version


firepower-2120# show chassis
  1-1             Chassis ID
  <CR>              
  >               Redirect it to a file
  >>              Redirect it to a file in append mode
  decommissioned  Decommissioned
  detail          Detail
  environment     Environment
  fabric          Fabric
  fi-iom          FI-IO Module
  fsm             FSM
  inventory       Inventory Information
  iom             IO Module
  psu             PSU
  |               Pipe command output to filter

firepower-2120# show chassis psu
Chassis    PSU        Type    Wattage (W) Overall Status
---------- ---------- ------- ----------- --------------
         1          1 N/A     0           Operable


firepower-2120# show chassis environment
Chassis 1:
    Overall Status: Operable
    Operability: Operable
    Power State: Ok
    Thermal Status: Ok


firepower-2120# show chassis environment psu
Chassis 1:
    Overall Status: Operable
    Operability: Operable
    Power State: Ok
    Thermal Status: Ok

    PSU 1:
        Overall Status: Operable
        Operability: Operable
        Power State: On
        Voltage Status: Ok


Issue a connect asa to return to ASA CLI.

firepower-2120# connect asa
Connection with FXOS terminated.
Type help or '?' for a list of available commands.
ciscoasa/sec/act/admin#


Friday, August 4, 2023

Configure FortiGate High Availability (HA) Active-Passive

Here's a link in configuring FortiGate High Availability (HA) in Active-Passive setup.

You can view the FortiGate HA mode under System > HA > Mode: Standalone (default).


You can also view HA mode by issuing either the get system status or get system ha commands.


FG-FW01_PRI # get system status

Version: FortiGate-40F v7.2.4,build1396,230131 (GA.F)

Firmware Signature: certified

Virus-DB: 1.00000(2018-04-09 18:07)

Extended DB: 1.00000(2018-04-09 18:07)

AV AI/ML Model: 0.00000(2001-01-01 00:00)

IPS-DB: 6.00741(2015-12-01 02:30)

IPS-ETDB: 0.00000(2001-01-01 00:00)

APP-DB: 6.00741(2015-12-01 02:30)

INDUSTRIAL-DB: 6.00741(2015-12-01 02:30)

IPS Malicious URL Database: 1.00001(2015-01-01 01:01)

IoT-Detect: 0.00000(2022-08-17 17:31)

Serial-Number: FGT40FTK2101234

BIOS version: 05000021

System Part-Number: P24680-04

Log hard disk: Not available

Hostname: FG-FW01_PRI

Private Encryption: Disable

Operation Mode: NAT

Current virtual domain: root

Max number of virtual domains: 10

Virtual domains status: 1 in NAT mode, 0 in TP mode

Virtual domain configuration: disable

FIPS-CC mode: disable

Current HA mode: standalone

Branch point: 1396

Release Version Information: GA

System time: Sat Mar 18 18:09:09 2023

Last reboot reason: power cycle


FG-FW01_PRI # get system ha status

HA Health Status: OK

Model: FortiGate-40F

Mode: Standalone

Group Name:

Group ID: 0

Debug: 0

Cluster Uptime: 0 days 0:0:0

Cluster state change time: N/A

ses_pickup: disable

override: disable

System Usage stats:

HBDEV stats:

number of vcluster: 0


In this post, I'll configure a pair of FortiGate firewalls in Active-Passive High Availability (HA) setup. Only one FortiGate device will actively process network traffic while the other device will just synchronize its config and remain standby in case of a failure. The Active-Passive mode also simplifies the network setup and troubleshooting since it has a deterministic traffic flow.


To configure FortiGate HA Active-Passive mode, go to System > HA >  Mode: Active > type Device priority: 200 (default is 128, higher priority is preferred) > type Group name: FG-FW01_CLUSTER (must be the same with Secondary FortiGate) > type a password (must be the same with Secondary FortiGate) > enable/toggle Session pickup (Secondary FortiGate will resume TCP, UDP, IPSec VPN and NAT session during failover) > select Monitor interfaces (LAN and WAN interfaces) > Heartbeat interfaces: a (used to send hello packets, sync config, sessions) > click OK.

Under Monitor Interfaces > click add (+) > select the interfaces to monitor. In this case the MGMT and data interfaces were selected. If one of the monitored interface failed, it will failover to the FortiGate with the most interfaces that are up/operational in the cluster.

Under Heartbeat interfaces > click add (+) > select the heartbeat "a" interface. I directly connected an RJ45 cable between the two FortiGate device. Click OK.

The same procedure is done in the Secondary FortiGate but the difference is using a Device priority of 100 (lower).


You can view HA status under System > HA. Just wait for 3-5 minutes for HA to synchronize. Sometimes you'll need to reboot the Secondary FortiGate for synchronization to work.


You can configure an out-of-band management IP address for the Primary and Secondary FortiGate. I configured this in CLI but this can be configured under System > HA > enable/toggle Management Interface Reservation > type the Gateway IP address.

FG-FW01_PRI # config system ha

FG-FW01_PRI (ha) # set ha-mgmt-status enable

FG-FW01_PRI (ha) # config ha-mgmt-interfaces

FG-FW01_PRI (ha-mgmt-interfaces) # edit 1

new entry '1' added


FG-FW01_PRI (1) # set interface lan1

FG-FW01_PRI (1) # set gateway 172.20.2.1

FG-FW01_PRI (1) # end

FG-FW01_PRI (ha) # end

FG-FW01_PRI # 


To view HA status/sync, you can issue either the diagnose sys ha status or get system ha status command.


FG-FW01_PRI # diagnose sys ha status

HA information

Statistics

        traffic.local = s:0 p:1446468 b:471747487

        traffic.total = s:0 p:1446412 b:471602671

        activity.ha_id_changes = 4

        activity.fdb  = c:0 q:0


Model=40, Mode=2 Group=0 Debug=0

nvcluster=1, ses_pickup=1, delay=0


[Debug_Zone HA information]

HA group member information: is_manage_primary=0.

FGT40FTK21091234:    Secondary, serialno_prio=1, usr_priority=200, hostname=FG-FW01_PRI

FGT40FTK21095678:      Primary, serialno_prio=0, usr_priority=100, hostname=FG-FW01_SEC


[Kernel HA information]

vcluster 1, state=standby, primary_ip=169.254.0.1, primary_id=0

FGT40FTK21091234:    Secondary, ha_prio/o_ha_prio=1/1

FGT40FTK21095678:      Primary, ha_prio/o_ha_prio=0/0


FG-FW01_PRI # get system ha status

HA Health Status: OK

Model: FortiGate-40F

Mode: HA A-P

Group Name: FG-FW01_CLUSTER

Group ID: 0

Debug: 0

Cluster Uptime: 0 days 3:59:9

Cluster state change time: 2023-03-18 22:49:45

Primary selected using:

    <2023/03/18 22:49:45> vcluster-1: FGT40FTK21091234 is selected as the primary because its override priority is larger than peer member FGT40FTK21095678.

    <2023/03/18 22:44:31> vcluster-1: FGT40FTK21095678 is selected as the primary because the value 0 of link-failure + pingsvr-failure is less than peer member FGT40FTK21091234.

    <2023/03/18 19:26:41> vcluster-1: FGT40FTK21091234 is selected as the primary because its uptime is larger than peer member FGT40FTK21095678.

    <2023/03/18 18:52:16> vcluster-1: FGT40FTK21091234 is selected as the primary because it's the only member in the cluster.

ses_pickup: enable, ses_pickup_delay=disable

override: enable

Configuration Status:

    FGT40FTK21091234(updated 4 seconds ago): in-sync

    FGT40FTK21095678(updated 5 seconds ago): in-sync

System Usage stats:

    FGT40FTK21091234(updated 4 seconds ago):

        sessions=14, average-cpu-user/nice/system/idle=0%/0%/0%/99%, memory=35%

    FGT40FTK21095678(updated 5 seconds ago):

        sessions=5, average-cpu-user/nice/system/idle=0%/0%/0%/100%, memory=35%

HBDEV stats:

    FGT40FTK21091234(updated 4 seconds ago):

        a: physical/1000auto, up, rx-bytes/packets/dropped/errors=38092643/156998/0/0, tx=38105486/90275/0/0

    FGT40FTK21095678(updated 5 seconds ago):

        a: physical/1000auto, up, rx-bytes/packets/dropped/errors=38100087/90259/0/0, tx=38086526/156993/0/0

MONDEV stats:

    FGT40FTK2109A1234updated 4 seconds ago):

        lan2: physical/100auto, up, rx-bytes/packets/dropped/errors=141415408/2060360/0/0, tx=10289012/81659/0/0

        lan3: physical/100auto, up, rx-bytes/packets/dropped/errors=24131614/227799/0/0, tx=10295220/81756/0/0

        PortChannel1: aggregate/00, up, rx-bytes/packets/dropped/errors=165547022/2288159/0/0, tx=20584232/163415/0/0

        wan: physical/1000auto, up, rx-bytes/packets/dropped/errors=266313568/1145360/0/0, tx=152763749/498545/0/0

    FGT40FTK21095678(updated 5 seconds ago):

        lan2: physical/100auto, up, rx-bytes/packets/dropped/errors=24139694/227900/0/0, tx=10292156/81684/0/0

        lan3: physical/100auto, up, rx-bytes/packets/dropped/errors=141448602/2060862/0/0, tx=10293884/81711/0/0

        PortChannel1: aggregate/00, up, rx-bytes/packets/dropped/errors=165588296/2288762/0/0, tx=20586040/163395/0/0

        wan: physical/1000auto, up, rx-bytes/packets/dropped/errors=259124868/1122118/0/0, tx=138256452/473772/0/0

Primary     : FG-FW01_PRI, FGT40FTK21091234, HA cluster index = 1

Secondary   : FG-FW01_SEC, FGT40FTK21095678, HA cluster index = 0

number of vcluster: 1

vcluster 1: work 169.254.0.2

Primary: FGT40FTK21091234, HA operating index = 0

Secondary: FGT40FTK21095678, HA operating index = 1


I simulated a device failover by rebooting the Primary FortiGate. The Secondary FortiGate became Primary/Active.

FG-FW01_PRI # execute reboot

This operation will reboot the system !

Do you want to continue? (y/n)y


System is rebooting...


The system is going down NOW !!


FG-FW01_SEC # get system ha status

HA Health Status:

    ERROR: FGT40FTK21091234 is lost @ 2023/03/21 10:45:49

    WARNING: FGT40FTK21095678 has hbdev down;

Model: FortiGate-40F

Mode: HA A-P

Group Name: FG-FW01_CLUSTER

Group ID: 0

Debug: 0

Cluster Uptime: 2 days 15:54:5

Cluster state change time: 2023-03-21 10:45:49

Primary selected using:

    <2023/03/21 10:45:49> vcluster-1: FGT40FTK21095678 is selected as the primary because it's the only member in the cluster.

    <2023/03/21 10:45:43> vcluster-1: FGT40FTK21095678 is selected as the primary because SET_AS_SECONDARY flag is set on peer member FGT40FTK21091234.

    <2023/03/19 22:16:52> vcluster-1: FGT40FTK21091234 is selected as the primary because its override priority is larger than peer member FGT40FTK21095678.

    <2023/03/19 22:16:42> vcluster-1: FGT40FTK21095678 is selected as the primary because its override priority is larger than peer member FGT40FTK21091234.

ses_pickup: enable, ses_pickup_delay=disable

override: disable

System Usage stats:

    FGT40FTK21095678(updated 5 seconds ago):

        sessions=10, average-cpu-user/nice/system/idle=0%/0%/1%/98%, memory=35%

HBDEV stats:

    FGT40FTK21095678(updated 5 seconds ago):

        a: physical/00, down, rx-bytes/packets/dropped/errors=594402106/1413899/0/0, tx=515709123/1429523/0/0

MONDEV stats:

    FGT40FTK21095678(updated 5 seconds ago):

        lan2: physical/100auto, up, rx-bytes/packets/dropped/errors=28648858/270239/0/0, tx=12107326/96090/0/0

        lan3: physical/100auto, up, rx-bytes/packets/dropped/errors=166350426/2423682/0/0, tx=12359514/98319/0/0

        PortChannel1: aggregate/00, up, rx-bytes/packets/dropped/errors=194999284/2693921/0/0, tx=24466840/194409/0/0

        wan: physical/1000auto, up, rx-bytes/packets/dropped/errors=269957042/1268488/0/0, tx=138662112/476451/0/0

Primary     : FG-FW01_SEC, FGT40FTK21095678, HA cluster index = 0

number of vcluster: 1

vcluster 1: work 169.254.0.1

Primary: FGT40FTK21095678, HA operating index = 0


The Primary FortiGate became Active again since it has a higher priority (200).

FG-FW01_PRI # get system ha status

HA Health Status: OK

Model: FortiGate-40F

Mode: HA A-P

Group Name: FG-FW01_CLUSTER

Group ID: 0

Debug: 0

Cluster Uptime: 2 days 15:56:10

Cluster state change time: 2023-03-21 10:47:26

Primary selected using:

    <2023/03/21 10:47:26> vcluster-1: FGT40FTK21091234 is selected as the primary because its override priority is larger than peer member FGT40FTK21095678.

    <2023/03/21 10:47:17> vcluster-1: FGT40FTK21095678 is selected as the primary because its override priority is larger than peer member FGT40FTK21091234.

ses_pickup: enable, ses_pickup_delay=disable

override: enable

Configuration Status:

    FGT40FTK21091234(updated 3 seconds ago): in-sync

    FGT40FTK21095678(updated 5 seconds ago): in-sync

System Usage stats:

    FGT40FTK21091234(updated 3 seconds ago):

        sessions=38, average-cpu-user/nice/system/idle=0%/0%/0%/99%, memory=33%

    FGT40FTK21095678(updated 5 seconds ago):

        sessions=10, average-cpu-user/nice/system/idle=0%/0%/0%/100%, memory=35%

HBDEV stats:

    FGT40FTK21091234(updated 3 seconds ago):

        a: physical/1000auto, up, rx-bytes/packets/dropped/errors=192898/562/0/0, tx=172622/456/0/0

    FGT40FTK21095678(updated 5 seconds ago):

        a: physical/1000auto, up, rx-bytes/packets/dropped/errors=594572404/1414349/0/0, tx=515960605/1430235/0/0

MONDEV stats:

    FGT40FTK21091234(updated 3 seconds ago):

        lan2: physical/100auto, up, rx-bytes/packets/dropped/errors=11240/117/0/0, tx=2152/17/0/0

        lan3: physical/100auto, up, rx-bytes/packets/dropped/errors=5352/25/0/0, tx=2408/21/0/0

        PortChannel1: aggregate/00, up, rx-bytes/packets/dropped/errors=16592/142/0/0, tx=4560/38/0/0

        wan: physical/1000auto, up, rx-bytes/packets/dropped/errors=85043/195/0/0, tx=46824/147/0/0

    FGT40FTK21095678(updated 5 seconds ago):

        lan2: physical/100auto, up, rx-bytes/packets/dropped/errors=29198292/274899/0/0, tx=12109482/96107/0/0

        lan3: physical/100auto, up, rx-bytes/packets/dropped/errors=166364690/2423890/0/0, tx=12890330/102976/0/0

        PortChannel1: aggregate/00, up, rx-bytes/packets/dropped/errors=195562982/2698789/0/0, tx=24999812/199083/0/0

        wan: physical/1000auto, up, rx-bytes/packets/dropped/errors=270528521/1273320/0/0, tx=139232137/481219/0/0

Primary     : FG-FW01_PRI, FGT40FTK21091234S, HA cluster index = 1

Secondary   : FG-FW01_SEC, FGT40FTK21095678, HA cluster index = 0

number of vcluster: 1

vcluster 1: work 169.254.0.2

Primary: FGT40FTK21091234, HA operating index = 0

Secondary: FGT40FTK21095678, HA operating index = 1


To manage or troubleshoot the Secondary FortiGate from Primary without exiting or opening a new CLI session, just issue execute ha manage 0 <admin/root account> command. This is similar to the Cisco ASA failover exec mate <show> command.

FG-FW01_PRI # execute ha manage 0 admin

Warning: Permanently added '169.254.0.1' (ED25519) to the list of known hosts.

admin@169.254.0.1's password:

FG-FW01_SEC #


Friday, July 14, 2023

FortiGate Firewall Firmware Upgrade

Here's a link regarding the firmware upgrade of a standalone FortiGate firewall using the web GUI.

To check the current FortiOS firmware version (in FortiOS 6.x), go to System > Firmware > Current version: FortiOS v6.4.6 build6083


You can perform a firmware upgrade either online via FortiGuard or manually (offline) which I've performed in this post. My target firmware is 7.2.2 build1255.


Always check the upgrade path using the Fortinet Upgrade Path tool and release notes. Select Current Product from the drop-down option (FortiGate-40F) > select Current FortiOS Version: 6.4.6 > select Upgrade to FortiOS Version: 7.2.2 > click GO.

The Recommended Upgrade Path is: 6.4.6 build 1879 > 6.4.8 build 1914 > 7.0.7 build 0367 > 7.2.2 build 1255.


Since I'm already on firmware version 6.4.6 build 6083, I upgraded first to 6.4.8 build 1914.


Go to FortiCloud > Support > Downloads > Firmware Download. You'll need to create a login and valid support contract in order to download the firmware.

Go to Download tab

Select the v7.00 directory folder.

Select the 7.2 directory folder.

Download the firmware according to FortiGate platform/model. In this case I used a FortiGate 40F.

Use the get system status command to verify in CLI.


FW01_PRI # get system status

Version: FortiGate-40F v6.4.6,build6083,210729 (GA)

Firmware Signature: certified

Virus-DB: 1.00000(2018-04-09 18:07)

Extended DB: 1.00000(2018-04-09 18:07)

IPS-DB: 6.00741(2015-12-01 02:30)

IPS-ETDB: 0.00000(2001-01-01 00:00)

APP-DB: 6.00741(2015-12-01 02:30)

INDUSTRIAL-DB: 6.00741(2015-12-01 02:30)

Serial-Number: FGT40FTK21091234

IPS Malicious URL Database: 4.00561(2022-12-15 11:35)

BIOS version: 05000021

System Part-Number: P24680-04

Log hard disk: Not available

Hostname: FW01_PRI

Private Encryption: Disable

Operation Mode: NAT

Current virtual domain: root

Max number of virtual domains: 10

Virtual domains status: 1 in NAT mode, 0 in TP mode

Virtual domain configuration: disable

FIPS-CC mode: disable

Current HA mode: standalone

Branch point: 1879

Release Version Information: GA

System time: Fri Feb 10 20:39:21 2023


 Download the firmware files needed for the upgrade path.


Click Checksum to view the MD5 and SHA-512 checksum code string/hash.


 Click HTTPS hyperlink to download the firmware file.


Go to System > Firmware > Select file > Browse > select the firmware file in your PC.


Click Backup config and upgrade.

Click Continue to proceed.

FortiGate-40F #


Firmware upgrade in progress ...


The FortiGate device will auto reboot. The firmware upgrade took around 3 minutes to complete and the login page with auto refresh.


The FortiGate will automatically backup the config and save in Downloads folder.

Upon login, it will show a quick video of the latest features in the new firmware.


The FortiGate doesn't have an Internet connection yet, so it failed to load the video.


Click OK to procced.


You can view the current firmware (in FortiOS 6.x) under System > Firmware > Current version: FortiOS v6.4.8 build 1914.

You can also view the firmware using the get system status command.


FortiGate-40F # get system status

Version: FortiGate-40F v6.4.8,build1914,211117 (GA)

Firmware Signature: certified

Virus-DB: 1.00000(2018-04-09 18:07)

Extended DB: 1.00000(2018-04-09 18:07)

IPS-DB: 6.00741(2015-12-01 02:30)

IPS-ETDB: 0.00000(2001-01-01 00:00)

APP-DB: 6.00741(2015-12-01 02:30)

INDUSTRIAL-DB: 6.00741(2015-12-01 02:30)

Serial-Number: FGT40FTK2101234

IPS Malicious URL Database: 1.00001(2015-01-01 01:01)

BIOS version: 05000021

System Part-Number: P24680-04

Log hard disk: Not available

Hostname: FortiGate-40F

Private Encryption: Disable

Operation Mode: NAT

Current virtual domain: root

Max number of virtual domains: 10

Virtual domains status: 1 in NAT mode, 0 in TP mode

Virtual domain configuration: disable

FIPS-CC mode: disable

Current HA mode: standalone

Branch point: 1914

Release Version Information: GA

System time: Sun Feb 12 03:17:50 2023


Perform the same steps until the target firmware is upgraded.


Starting FortiOS version 7.0, the firmware version is either checked under System Firmware or Fabric Management > Firmware Version: v7.0.7 build 0367.


To upgrade firmware, go to System > Firmware > File Upload.

Select the target firmware image file > click Confirm and Backup Config.

Alternatively, you can go to System > Fabric Management > select Device: FortiGate-40F > Upgrade.

Select File Upload > select Firmware image file > click Confirm and Backup Config.

Click Continue to proceed.


FortiGate-40F # get system status

Version: FortiGate-40F v7.2.2,build1255,220930 (GA.F)

Firmware Signature: certified

Virus-DB: 1.00000(2018-04-09 18:07)

Extended DB: 1.00000(2018-04-09 18:07)

AV AI/ML Model: 0.00000(2001-01-01 00:00)

IPS-DB: 6.00741(2015-12-01 02:30)

IPS-ETDB: 0.00000(2001-01-01 00:00)

APP-DB: 6.00741(2015-12-01 02:30)

INDUSTRIAL-DB: 6.00741(2015-12-01 02:30)

IPS Malicious URL Database: 1.00001(2015-01-01 01:01)

IoT-Detect: 0.00000(2001-01-01 00:00)

Serial-Number: FGT40FTK2101234

BIOS version: 05000021

System Part-Number: P24680-04

Log hard disk: Not available

Hostname: FortiGate-40F

Private Encryption: Disable

Operation Mode: NAT

Current virtual domain: root

Max number of virtual domains: 10

Virtual domains status: 1 in NAT mode, 0 in TP mode

Virtual domain configuration: disable

FIPS-CC mode: disable

Current HA mode: standalone

Branch point: 1255

Release Version Information: GA

System time: Sun Feb 12 03:34:24 2023

Last reboot reason: warm reboot