OpenDNS (now called Cisco Umbrella) was acquired by Cisco last year (2015) and they provide cloud-based (SaaS) web content filtering and security at the DNS layer. It's simple to deploy and there's no hardware to install and maintain. Just point your network to use OpenDNS public servers 208.67.220.220 and 208.67.222.222 and you'll be protected from the latest malware, botnets and other security threats. You'll also have network visibility such as top domains, top categories, etc. Here's a great link on how OpenDNS work.

I've configured a guest network for a customer who wants to block certain websites and PAT'd them to a public IP address which is configured on an ASA firewall. The public IP address will act as one "seat" when creating an entry on OpenDNS portal.
object network GUEST
subnet 172.27.223.128 255.255.255.192
nat (GUEST,outside) dynamic 202.7.2.8 dns
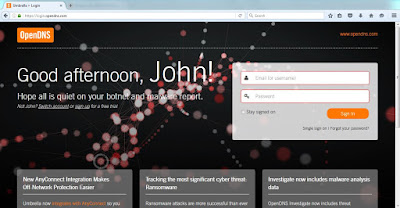
You first login to OpenDNS admin dashboard.

To add a new "seat" or customer, click on MSP Console (handshake icon) > Customer Management > +.

Type a name (whichever makes sense to you) and type "1" under Seats and click Save.

Search for the newly created customer.

Go to Configuration > Identities > Network > + > type a Network name and IP address > Save.


Go to Policy Settings > Category Settings > + > type the policy name > choose blocking level. There are predefined web categories if you chose either Low, Moderate and High but you can customize if you choose Custom.


You could also go directly to Identities > Networks > click on Primary Policy (Default Policy) and it will redirect you to Category Settings.

Go to Default Policy > Select Policy Settings > Category setting to enforce > add new setting > Save.


You could also blacklist or whitelist websites by going to Policy Settings > Default Policy > Select Policy Settings > MSP Default Block Domainlist or MSP Default Allow Domainlist > type a domain > click + or press Enter to add.

To verify if the policy would work, go to Configuration > Policy > Policy Tester (in blue text with a gear icon) > search Identity and type a website. It takes several hours for the new policy to take effect due to the slow nature of DNS technology (propagation delay).


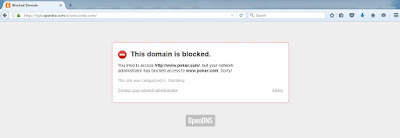
Below is an OpenDNS error message if a domain or a website hits a blacklist or a blocking category policy.


You can also raise a support case directly from the portal by just clicking Support on the lower left hand corner.

I've configured a guest network for a customer who wants to block certain websites and PAT'd them to a public IP address which is configured on an ASA firewall. The public IP address will act as one "seat" when creating an entry on OpenDNS portal.
object network GUEST
subnet 172.27.223.128 255.255.255.192
nat (GUEST,outside) dynamic 202.7.2.8 dns
You first login to OpenDNS admin dashboard.


To add a new "seat" or customer, click on MSP Console (handshake icon) > Customer Management > +.

Type a name (whichever makes sense to you) and type "1" under Seats and click Save.

Search for the newly created customer.

Go to Configuration > Identities > Network > + > type a Network name and IP address > Save.


Go to Policy Settings > Category Settings > + > type the policy name > choose blocking level. There are predefined web categories if you chose either Low, Moderate and High but you can customize if you choose Custom.


You could also go directly to Identities > Networks > click on Primary Policy (Default Policy) and it will redirect you to Category Settings.

Go to Default Policy > Select Policy Settings > Category setting to enforce > add new setting > Save.


You could also blacklist or whitelist websites by going to Policy Settings > Default Policy > Select Policy Settings > MSP Default Block Domainlist or MSP Default Allow Domainlist > type a domain > click + or press Enter to add.

To verify if the policy would work, go to Configuration > Policy > Policy Tester (in blue text with a gear icon) > search Identity and type a website. It takes several hours for the new policy to take effect due to the slow nature of DNS technology (propagation delay).


Below is an OpenDNS error message if a domain or a website hits a blacklist or a blocking category policy.
There's also a Reports section to check top domains, top categories, etc.


You can also raise a support case directly from the portal by just clicking Support on the lower left hand corner.
