Before configuring Malware and File Blocking Policy, go
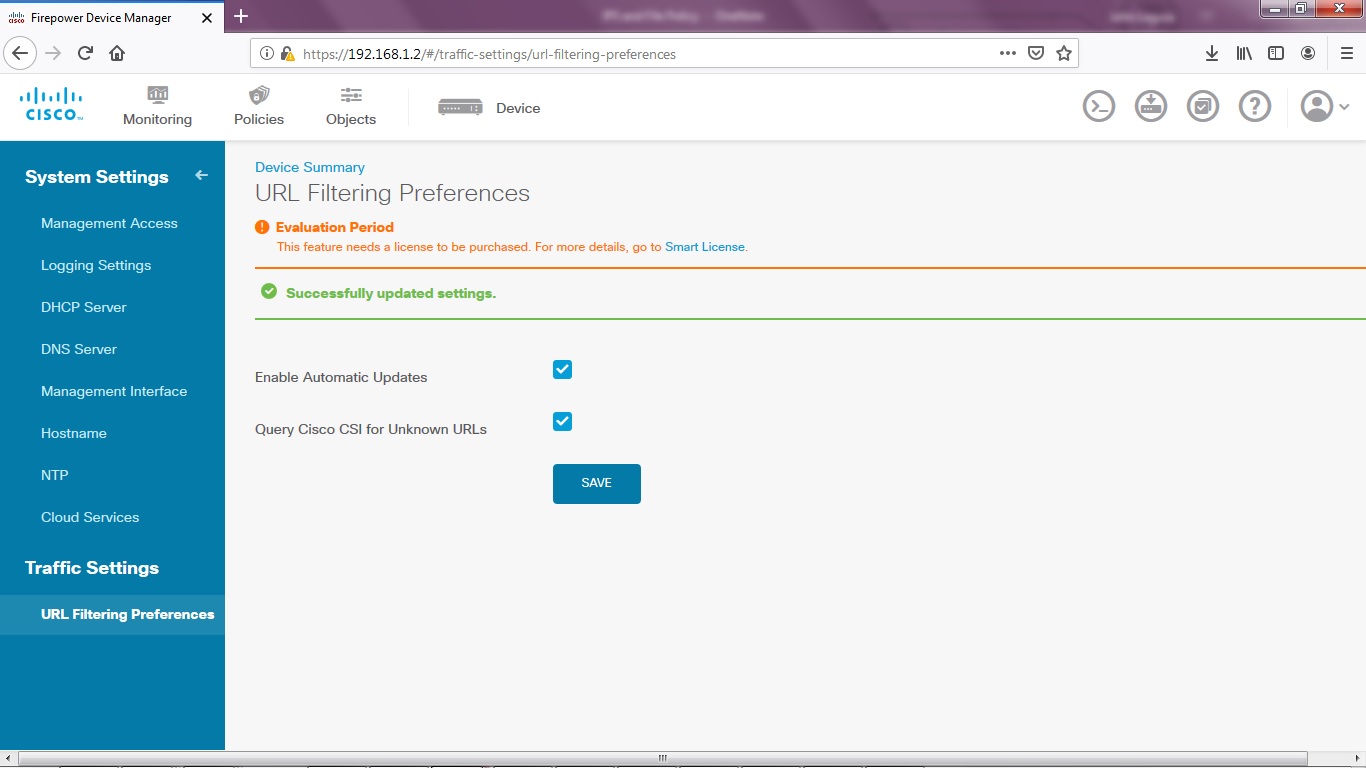
to Devices > Traffic Settings > URL Filter Preferences.


To configure a Malware, IPS and File Policy, go to Policies > Access Control > click add (plus icon).


Go to File Policy tab > Select The File Policy: Block Office Document and PDF Upload, Block Malware Others > click OK.

Go to Intrusion Policy tab > toggle Intrusion Policy to enable > select Balanced Security and Connectivity.


Go to Logging tab > Select Log Action: At Beginning and End of Connection > click OK.

Click Deployment > Deploy Now.


To test the Malware blocking policy, you can download an EICAR test file. It's a harmless file used for testing Antivirus and IDS/IPS policy or signature.

I was unable to download the EICAR test file and got a web page was blocked (page can't be displayed).


To view Malware Block logs, go to Monitoring > Events > Malware File > View Details.

Hover to a specific Event > View Details to view more info.


Type Rule Action=Block in the Filter field to filter or narrow down Event Connections. Click Filter and hover a specific Event

Hover to a specific Event > View Details to view more info.


To test PDF File Upload, go to tinyupload.com > browse and choose a PDF file > click Upload.

Notice the file upload is indeterminated (unknown).

To view Event logs, go to Monitoring > Events > type Rule Action=Block in the Filter field > click Filter. Hover a specific Event Connection > View Details.


Select
Query Cisco CSI for Unknown URLs > click Save.
This enables the FTD to query Cisco Security Intelligence (CSI) Cloud for
malicious file and malware analysis.

To configure a Malware, IPS and File Policy, go to Policies > Access Control > click add (plus icon).

Select
Order: 3 > type a Title: BLOCK-MALWARE-PDF-IPS > Action: Allow >
Source Zone: inside_zone > Networks: INSIDE-NET
Notice
the Action: Allow is needed for Malware and File inspection engine to work
properly.

Go to File Policy tab > Select The File Policy: Block Office Document and PDF Upload, Block Malware Others > click OK.

Go to Intrusion Policy tab > toggle Intrusion Policy to enable > select Balanced Security and Connectivity.


Go to Logging tab > Select Log Action: At Beginning and End of Connection > click OK.

Click Deployment > Deploy Now.


To test the Malware blocking policy, you can download an EICAR test file. It's a harmless file used for testing Antivirus and IDS/IPS policy or signature.

I was unable to download the EICAR test file and got a web page was blocked (page can't be displayed).


To view Malware Block logs, go to Monitoring > Events > Malware File > View Details.

Hover to a specific Event > View Details to view more info.


Type Rule Action=Block in the Filter field to filter or narrow down Event Connections. Click Filter and hover a specific Event

Hover to a specific Event > View Details to view more info.


Notice the file upload is indeterminated (unknown).

To view Event logs, go to Monitoring > Events > type Rule Action=Block in the Filter field > click Filter. Hover a specific Event Connection > View Details.


No comments:
Post a Comment